
Have you ever wondered how some creatives seem to churn out masterpiece after masterpiece while others struggle to produce anything even remotely good?
It’s not all talent and luck—a lot of it has to do with the creative workflow they’ve mastered.
This might surprise you, but establishing a creative workflow is not about transforming creative work into a standardized process.
It’s something that will make everyone’s lives easier while allowing the creatives to stay creative.
To ease your mind and help you experience the benefits of having a creative workflow in place, we’re going to talk about:
- 5 stages of a creative workflow
- 4 reasons why you need a creative workflow
- 8 steps to establishing a creative workflow
So if you’re ready to start taking your creativity to the next level, keep reading!
Table of contents
What is a creative workflow?
A creative workflow is defined as a logically-sequenced series of processes and creative operations involved in creative project completion—from ideation to design to publish to sign-off.
To put it simply, a creative workflow is about establishing a roadmap to efficiently leverage your creativity in a business context while letting your collaborators know what your creative process looks like.
Now, we know creativity is a feral force that cannot be tamed by something as rigid as “process.”
And why should it be?
For many, it belongs to the mythical.
Some just can’t wrap their minds around the concept of some people being wired differently, having infinite flows of innovative ideas, and making connections that nobody else could.
Yes, you’re special!
Creativity is an invaluable, innate gift that cannot be fully contained.
Designers, copywriters, devs, marketers, advertisers, and creative agencies; we’re looking at you!
But we, the creative people of the world, found a way to leverage this gift and turn it into a career. However, many creatives can get bogged down in non-creative things when there are no processes in place.
And, luckily, following a creative workflow will not hinder or alter your creative operations in any way. Instead, having this type of process in place will help you have a well-defined structure that gives you more room to do what you do best—create.
Furthermore, creative workflow management can also help make sure you:
- Are in line with client demands
- Keep creative assets’ quality standards high
- Stay on top of deadlines

So, establishing a standardized creative workflow will help you steer your creative process in the right direction.
Now, let’s see what a typical creative workflow looks like.
5 phases of a creative workflow
Before breaking down the main stages of an effective creative workflow process, let’s agree that this shouldn’t be looked at as a template or a recipe for success.
Every team is different and has distinct needs, which greatly impacts what their creative workflow looks like.
Below, we’ll follow a general workflow structure that can be a great starting point when still figuring things out as a creative team.
As the team develops and defines its needs and ways of working together, the workflow might take a different direction, as per the team’s newly identified needs.
The workflow stages we’re going to look at are:
- Briefing
- Scheduling
- Creative production
- Review and feedback
- Project approval and launch
- Debriefing

Now that we’ve got that out of the way, let’s get into it.
1. Project definition (AKA the brief)
This is the first stage of defining the project.
At this phase, you receive the project brief from the client or the manager of your department.
Ideally, the brief should contain everything you need to successfully complete the project. And, in a perfect world, your collaborators should follow a creative brief template that includes the essential elements you need to successfully complete the task.
But as we all know, this is not always the case.
Sometimes you can get vague instructions, unclear suggestions, and a series of clues you have to piece together yourself.
We know you didn’t sign up to be a private detective.
To avoid Sherlocking around the office when it’s time to get started on the project, you should clarify any aspect that may seem unclear at this stage.
If you’re a freelancer, now is the time to go over contractual details, invoicing agreements, and the like. You should settle all of this from the get-go and get it off your mind so nothing will distract you from planning and executing the task at hand.
After dispelling any ambiguity, you can move on to scheduling.
2. Scheduling
Realistic scheduling is essential to the success of any project.
Think resource allocation, setting goals, defining milestones, and (bear with us 🥺) setting deadlines.
We know you are in a love-hate relationship with deadlines. But let’s focus on the love part.
Without deadlines, you can’t procrastinate!
Why is that important?
Apparently, moderate procrastination can boost creativity.
Amazing, right?
So, having well-established deadlines will not only make clients and higher-ups happy but will also keep those sweet creative juices flowing.
3. Creative production
This is the fun part where the project starts moving forward—the ‘creation’ stage, the realm of brainstorming, teamwork, and getting stressed over due dates 🙃.
Here, you’ll probably do nothing until there’s little time left until you have to submit your first draft (assuming you don’t use any time tracking tools).
See? We told you that having a creative workflow won’t mess with your way of getting things done!
You’re still able to do whatever you want when you want.
Just make sure that you keep your team informed on your progress and get the draft ready for review by the set deadline.
Speaking of the devil…
4. Review and feedback
Let the game begin!
All Saw references aside, doesn’t it feel like pure torture when you receive endless revision requests that make little to no sense over email?
Oh, and those doodled screenshots in the email attachments that are supposed to provide context for the feedback?
Absolutely barbaric!
We don’t think it’s too dramatic to say that email feedback loops should be forbidden by law. The process—we’ve all been there—is just too painful.
Luckily, there are tools out there that can eliminate bottlenecks from the approval process without sacrificing creative brain cells.
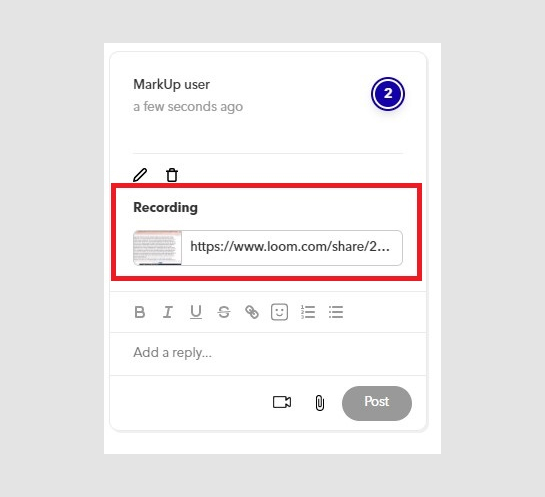
A collaboration tool like MarkUp.io helps you create markups with the most common file formats out there using your preferred web browser.
Supported file formats include AI, PSD, JPG, JPEG, PNG, SVG, BMP, GIF, EPS, TIFF, TXT, PPTX, PDF documents, and video files.
You can share your markups with team members, stakeholders, and clients via a link. That means you can say goodbye to endless threads of emails.
But that’s not even the best part!
When clicking the link, your collaborators can simply drop a pin wherever they think edits are needed and just leave a nicely-formatted comment for you with contextual feedback. Using our Loom integration, collaborators can also record themselves clarifying their comments, giving you everything you need to get requested edits right the first time.
The simplified proofing process will surely keep you from ripping your hair out while preparing the second draft for final approval!
5. Approval and project launch
Congrats! You just got the final signoff—the most satisfying stage of the project management cycle.
Now that the final product has gone live, it’s time to wind down a bit.
Or is it?
Bonus stage: Debriefing
After the deliverables are approved, you can go through the feedback one more time to collect relevant insights that can help you improve your performance.
You can easily do this step with MarkUp.io: your markup stores all of your comments in the Resolved tab.
Super convenient, right?

And if you’re still not convinced you should consider implementing a creative workflow, we invite you to keep scrolling—maybe we’ll change your mind!
4 reasons establishing a creative workflow process matters
To sum it all up, a creative workflow will help you strategically avoid any mishaps before, during, and after the creation process through:
- Effective communication and collaboration
- Efficient time and creative project management
- Maximized creativity flow
Let’s take a deeper dive into the importance of having a well-established creative workflow.
Reason #1: Harness creativity to the maximum
Did you know that over 70% of people feel like they’re not reaching their creative potential?
Chances are you’re one of them.
If so, you’ll be happy to find out that a creative workflow can help you focus more on creation by removing all the planning from the equation.
Now, we’re not saying that a creative workflow will magically get the inspiration flowing. Not at all.
However, when you’re following a strategic plan, you’re removing a lot of distractions.
You don’t have to worry about invoicing, setting deadlines, and so on because you have those covered in different stages of your workflow.
A creative workflow is not magic, it’s just a way for you to stop dwelling on what the next step is and actually focus on what you’re doing.
Reason #2: Minimize confusion and miscommunication
In the U.S., roughly 80% of employees are stressed due to ineffective communication across their organization.
Lucky for you, that source of stress can be reduced through *drum roll, please:* a creative workflow.
With every step of the project mapped out, you will be able to effortlessly minimize miscommunication and increase transparency.
Think about it—your entire team has a clear overview of the whats and whens of your tasks.
No need to constantly ask for progress updates! Everyone knows what everybody is up to by taking a quick look at the creative workflow of in-progress projects.
When progress updates become a thing of the past, communication becomes more efficient.
That’s great news for your company because effective communication helps businesses be 4.5x more likely to increase employee retention rates.
Reason #3: Collaboration is streamlined and more effective
A detailed creative workflow is a blessing for projects with lots of interdependent tasks that require a collaborative effort from multiple team members.
Picture it—people aware of who is responsible for what just by looking at the workflow outline.
Everyone will know who to talk to without creating never-ending email chains just to ask who is doing tasks X and Y. The result?
Seamless digital collaboration.
Reason #4: Save valuable time and money
When you have a pre-established project layout, you don’t have to waste time on guesswork.
You’ll know what needs to be done, at which stage of the process, which resources you will need, which metrics to track, and how much time it takes to accomplish your objectives.
Getting all this out of your way will free up a lot of time for you to work on value-added tasks or even squeeze more projects in.
You know where this is going, don’t you?
All these time savings will translate into opportunities for you to make more money.
Finally, it’s time to get down to the action plan and see how you can assemble a creative workflow that will help you leverage all these benefits.
Build an effective creative workflow process in 8 simple steps
Hopefully, by now you’ve realized there’s no way around it: you and your team need to establish a creative workflow.
To help you get started, we’ve sketched out an 8-step workflow system that includes fun things like:
- Project scope
- Resource allocation
- Workflow steps
- Progress tracking
And much more!
Don’t you worry if it looks intimidating!
We’ll discuss each of these steps in detail and tell you exactly how and what needs to be done.
Have a look at the workflow diagram below to get an idea of what this process looks like.

Step #1: Clarify the objectives and goals of the project
It’s super important to know what you’re working towards before getting to work. How else will you measure performance?
So, the first thing you need to do for each project you’re going to work on is to establish the project scope and jot down:
- Goals of the project
- Digital assets you need to deliver
- Metrics to be tracked
- Deadlines to be met
Your first instinct might be to create a spreadsheet with everything outlined above. Don’t 🧐.
There are better ways to manage your team’s creative output out there.
Just have a bit of patience until we get to step number five—we’ll tell you all about the workflow management systems you can use to make your job easier.
Now, how about you make everyone’s jobs easier?
Step #2: Assign tasks and responsibilities wisely
As you can probably already tell, a creative workflow needs constant management. It’s not a one-time thing.
One of the things you need to constantly do is assign tasks to people. Easy, right?
Not quite. There’s more to delegating tasks than just tagging a coworker to a part of the project —at least when you want to do it effectively.
You have to take into account things like employee performance, seniority, preferences, abilities, expertise, and so on.
In short, you have to know the strengths and weaknesses of each team member.
And since we’re our own worst critics, the simplest way to get this info is to perhaps incorporate something similar to a self-made SWOT analysis into your employee review process.
This way, you’ll have a database containing all the details you need for efficient task assignments.
Step #3: Establish the main project workflow steps (and optimize whenever necessary!)
Before going full speed ahead with what you think you know about how your team works, take a step back and actually analyze how everything is done.
It shouldn’t surprise you to discover that your team of creative professionals does things differently—and not necessarily in a well-organized way.
Although your team is perfectly capable of finalizing projects, that doesn’t mean they don’t need help with workflow optimization.
A thought-through workflow should extinguish the flames around the office—make that your main objective.
If you’re a freelancer, you’ll need to pull yourself out of the fire.
You can do so by outlining your workflow steps around the five stages we discussed earlier in this blog post.
Step #4: Take extra care of revisions and the review process
Giving, receiving, and asking for feedback can be uncomfortable (to say the least, 😱)—especially when done over email or Slack.
If it’s the neverending haggling that kills the vibe and makes you and your team feel like you’re stuck in limbo; however, if you’ve made it this far in our blog, you already know you have the power to change that in a jiffy.
We’ve already discussed how MarkUp.io makes the proofing process as smooth as possible through sharable canvases and contextual feedback.
We just love feedback—it’s an integral part of growing as a professional. That’s why we’re making it so darn easy to request and receive it with just a few clicks.
And we’re not the only ones!
Feedback is considered valuable by as many as 75% of employees.
That being said, it’s paramount to ensure you’re making it easy to:
- Seamlessly collaborate with clients and team members
- Have a thorough visual overview of every change that was requested
- Collect feedback patterns for employee (or self) performance evaluations
- Get notifications and stay in the loop when somebody requests revisions
- Control account-level permissions for clients and team members
Step #5: Use creative workflow tools and software
Remember when we told you to resist the urge to create a workflow spreadsheet?
We advise you to do so because you’re more likely to create and efficiently manage a creative workflow with the use of collaboration tools.
Take Asana, for example. This tool helps you manage tasks at a granular level and makes workflow management hassle-free.
Specifically, you can create, assign, and schedule tasks with ease while increasing workflow visibility and transparency across the entire team.
Other software types you can have a look at include:
- Project management software
- Editing software
- Annotation tools 😉
- Digital asset management platforms
- Creative workflow software
- Project management tools
- Marketing management software
And pretty much anything else that will contribute to the smooth delivery of the finished product to the client and bring you closer to creative automation.
Step #6: Keep everyone in the loop
Communication is the building block of any project’s success. It allows everyone on the team to feel connected, educated, and informed about their tasks.
Moreover, communication creates trust, builds camaraderie among the team members, and boosts morale!
These perks make it worth your while to have open channels of communication so that you can keep an entire team engaged in the workplace.
A good way to harness all those benefits is to schedule regular kickoff meetings instead of having a messaging-only communication system.
But don’t overdo it. Just make sure you have enough one-on-one time with the team to keep everyone up to speed with what’s going on within your organization.
Step #7: Monitor progress
When we say track progress, we’re not referring to micro-managing your teammates.
Constantly asking for updates is never productive.
What you can do instead is to set project deadlines as part of your creative workflow. And, to ensure there are no delays in production and your team is meeting deadlines, you should consider setting due dates for every part of the process.
For example, you can have a deadline for the first draft, another for internal proofing, one more for the second draft, another for the client review, and so on.
This gives you the ability to break down complex projects into smaller, easily-manageable tasks.
Step #8: Gather and analyze feedback
Finally, all that’s left to do now is to keep a close eye on feedback, identify recurring issues, and collect actionable insights that can help your team improve their output quality.
With the collected data, you can then create a knowledge base that can be accessed by team members at any time.
Having access to historical data from past collaborations with a client will help creatives take into account clients’ preferences at the first draft level, thus minimizing revisions.
Not only that, but a feedback archive will also streamline your relationships with clients as they will feel heard and valued.
Now it’s time to show us your moves!
Over to you
Now, you know what a creative workflow is, how to create one, and the benefits that come with it.
We know your team is unique, and you’ll have to adapt the outline we provided so that it meets your needs.
But one thing will surely stay in its place within any creative workflow—the feedback stage.
As you already know, the proofing phase doesn’t have to be a complicated, messy procedure—and MarkUp.io is here to prove exactly that.
Create a MarkUp.io account for free and explore the power of real-time, seamless collaboration.
Click here to make your feedback loops disappear!
Frequently asked questions (FAQs)
Still have some questions about creative workflows? We’ve got you covered.
Below, you’ll find the answers to some of the most frequently asked questions about the matter.
If you still feel like you’re missing some info, you can give us a holler.
Q1. What problems can a creative workflow help solve?
A successful creative workflow helps a team achieve its objectives while also solving problems like:
- Inefficient communication
- Unproductive task management
- Ineffective collaboration
- Missed deadlines and poor time management
Q2. How do I create a creative workflow?
To create a creative workflow, you need to first take a look at your team’s existing workflow.
When doing so, try to identify patterns and create an optimally sequenced series of creative operations that will make up your creative workflow.
Q3. Why do you need a creative workflow process?
The aim of a creative workflow process is to create a standardized work procedure that enables creative professionals to boost creativity while improving communication, productivity, and collaboration.