
You’ve just signed a big website-development project with a huge budget.
The only issue is time: the client wants the website done yesterday.
After delegating some vague tasks on Asana – after all, you tell yourself, there isn’t enough time to properly plan – your team does the best they can with the limited info they’ve received.
Finally, with only a few delays, the project is delivered on time for the client to review.
The client review does not go as expected. They’re not happy with the user experience and website content.
Next time, they’ll go with another digital agency, and you’ll know why.
It’s because you didn’t take the time to plan this right.
Instead of blaming yourself, you decided to make sure you never make that mistake again. That’s what brought you here, right?
We’ve got a quick fix for you—a website-timeline template to help you deliver high-quality work on time.
Use it for sites, web applications, and any other web project.
But before getting to the template, let’s cover the basics of building a website timeline! 😀
Table of contents
- What’s a website timeline?
- Why is having a website timeline important?
- 7 steps to creating a website design timeline
- Download our free website timeline template
What’s a website timeline?
A website timeline is a project-management element that provides a visual representation of the milestones and tasks – laid out in chronological order – that must be completed to complete a web development project successfully.
Think of it as an infographic that helps you and your team visualize the project plan. It offers an overview of:
- Tasks and their dependencies
- Project milestones
- Estimated duration of tasks
- Resources needed to complete each task (workforce, technology, and other supplies)
- Due dates
Visually seeing all this information helps every team member involved in the website’s creations know their roles, what’s expected of them, and how their work impacts completing tasks.
That’s why providing your team with a website timeline is important before taking on a new web design project.
It’s a useful document for content writers, content reviewers, web designers, developers, QA engineers, and anyone else participating in the web development and design process.
But why and how is a timeline useful for a website development project?
Why is having a website timeline important?
How often have you and your team had to pull an all-nighter to deliver a website project on time? Fortunately, those late nights can be avoided – it all starts with having a defined plan from the get-go.
A properly executed website timeline offers you all the data you need, displayed visually, so you can make decisions quickly.
Plus, a website timeline also:
- Helps you avoid scope creep: You can accurately estimate if your team can fulfill new client requirements.
- Boosts productivity and accountability: Employees clearly understand how a delay in their work can affect dependent tasks. After all, nobody wants to be the bottleneck!
- Improves time management: Workers are more likely to deliver on time when clear and realistic due dates are set.
- Helps you avoid going over budget: The project requirements, budget, deadlines, and client expectations are clear, and you know exactly what resources and time you need to complete the project without overspending.
In short, creating a website timeline before starting to work on any web development project helps you manage resources more efficiently.
If you’re sold on website timelines and eager to get to work, here’s a seven-step process you can follow to create the last website timeline your team will ever need.
7 steps to creating a website design timeline
Now comes the hands-on fun part!
We’ve created a step-by-step tutorial on how to create a timeline for your new website project so that you’ll avoid last-minute stress when the client reviews your work.
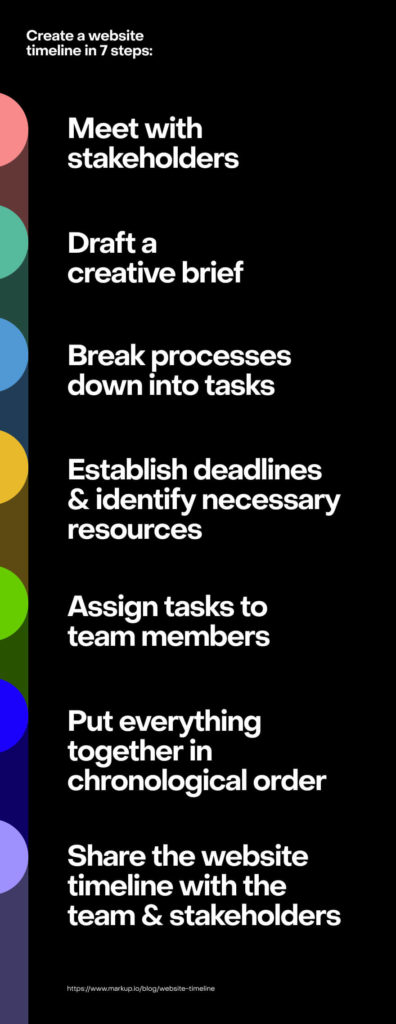
Step #1: Meet with stakeholders
Creating a website timeline is part of the project-planning process.
So, naturally, the first thing to do when drafting a project timeline is to meet with the stakeholders. This important conversation will allow you to establish their expectations, your team’s capacity, and how you can combine the two to complete the project.
No pressure, but this meeting is a decisive step for your team’s success.
The amount of time it will take to complete the project depends on what questions you ask the client and the amount of detail they provide.
So, don’t hesitate to ask for clarifications where necessary and annoy your clients with follow-up questions. 😈
Nail down the specifics in topics like:
- Budget: How much is the client willing to spend on the new site?
- Goal: What’s the main objective of the project?
- Expected deliverables: While the overall deliverable you’re creating is the website, you should establish the site’s structure early on (i.e., a portfolio website with a home page, an “About us” page, and a blog).
- Deadline: When does the client want to launch the website?
In addition to these questions, you should ask the client to share their brand guidelines and style guides with your team.
You need these documents to have shorter and faster reviews. This means your project will not be delayed due to revision requests because of using the wrong fonts, tone of voice, and other brand-identity elements.
Write everything down and collect all the shared files; you’ll need this information for the next step.
Step #2: Draft a creative brief
Now condense your meeting notes into a one-page document that highlights all the essential data your team needs to ensure smooth production and sign-off.
This one-pager is called a creative brief—a blueprint for creative professionals. It helps teams add transparency to their workflow, be more productive, and get projects approved faster.
To draft a comprehensive creative brief, you need to:
- Highlight the project’s objectives
- Write a project summary
- Include information about the client’s company and its background
- Define the target audience
- Identify the client’s competitors
- Expand on expected deliverables
- Document the deadline and budget
Pro Tip: Go to our blog post on creative briefs to get tips and actionable strategies on how to create an effective creative brief.
This document will help your team understand the client’s requirements and expectations, making it easier for you to organize your notes for the next step.
Step #3: Break the processes down into tasks
Once the irrelevant info in your notes is stripped away and a clear overview of what’s expected from you is provided by the creative brief, you will be able to move forward with creating the tasks and subtasks that are needed for the project’s completion.
That’s a fancy way of saying you should figure out which steps go into the project.
To make this easier, slowly zoom in on the process step by step and increase the level of detail with each zoom-in. 🔎
For example, in the first stage, zoom in on the project’s major stages:
- Design
- Content creation
- Development
- QA, debugging, and beta testing
- Internal review
- Client review
- Launch
In the second phase, you’d create tasks for each project stage:
- Design: Page layouts for the homepage, about us page, portfolio, landing page, and blog.
- Wireframing and mockups
- Internal review
- Prototyping and page animations
- Internal review
- Client review
- Content creation: Text for the homepage, about us, social media channels, new content, and on-page search engine optimization (SEO) for three blog posts.
- First draft
- Internal review
- Second draft
- Internal review
- Editing and proofreading
- Client review
- Development: Transferring the design prototypes for all internal pages into the content management system (CMS) and developing the required functionality.
- Purchase a domain name
- Choose a hosting service and CMS (i.e., WordPress, Webflow, Squarespace, etc.) to meet the client’s needs
- Structure the site architecture and create a sitemap
- Client review
- Build the website and make it responsive to all screen sizes
- Install plugins
- Add technical SEO elements
And so on—you get the gist of it. Your tasks should go into as much detail as possible to ensure you’ll avoid underestimating the time and effort it takes to complete each one.
Step #4: Establish deadlines and identify necessary resources
With each step of the process clearly outlined, you can now set realistic and reasonable deadlines for all the tasks and subtasks.
If you’re a frequent visitor to our blog, you already know about the planning fallacy and how it’s among the main reasons why projects fail.
For those visiting our blog for the first time, you should know that people tend to underestimate the time it takes to complete a task—that’s what the planning fallacy is.
So, keep this in mind when setting deadlines and overestimate the time necessary for each task to be executed.
Step #5: Assign tasks to team members
After you estimate the hours your team needs to work on the new website creation, find the most efficient way to balance the client’s budget, project timeframe, deadlines, and your team’s available resources.
For example, if the only constraint is time and the budget is generous enough, you can assign three devs instead of one to finish the development phase faster.
If budget is a constraint but time is not, you will have to employ fewer resources and team members to finish the project.
In addition to these limitations, you must account for your team’s availability when assigning tasks.
Head over to your team’s time-off calendar and see who’s having martinis and riding horses into the sunset on an exotic beach and who’s reporting for duty for the project’s duration.
Plus, keep in mind each employee’s preferences and expertise, as people tend to be more productive when they like what they’re doing.
Needless to say, being an expert on certain topics cuts research time on those topics significantly, leading to faster delivery.
If you consider all these variables when assigning tasks, you will most likely get it right.
Step #6: Put everything together in chronological order
Finally, all the hard work is done. Now all you have to do is find the most time-efficient order for the project’s tasks.
An easy way to do this is to identify independent processes that can be worked on simultaneously.
For example, content writers can write blog posts while designers create wireframes.
Try to plan your schedule so you can overlap as many independent tasks as possible to save time and have a little wiggle room if unexpected situations arise, like sick leave.
Step #7: Share the website timeline with the team and stakeholders
How exciting! Now the web project is sketched out, and your timeline design is ready to be shared with the team.
To make this experience interactive, you can draft your website timeline with collaborative tools like Google Sheets (we’ll show you how in a second).
Alternatively, you can use any timeline maker you want, capture a screenshot of your document, and add it to an online feedback tool like MarkUp.io.
With an annotation platform like MarkUp.io, you can drag and drop your timeline design onto your Workspace and share it with the team and stakeholders via link or email.
Reviewers can then click anywhere on your MarkUp and leave comments with their input and ask questions.
In case you don’t have access to a specialized tool for website timeline creation, we have good news for you!
Download our free website timeline template
We thought it irresponsible of us to send you out into the world of project planning without an interactive timeline template up your sleeve.
So, we designed a website timeline template in Google Sheets that you can copy, edit, and make your own.
Have a look:

It has a field for each essential element discussed in the previous section. You can add infinite rows to break down your tasks into as many subtasks as necessary.
You can easily share it with stakeholders and team members via a link.
Click here to download our free website timeline template!
Oh, wait!
We forgot something…
Now over to you
Before you jump straight to planning your next website project with your brand new shiny timeline template, give MarkUp.io a try.
Our platform helps you get feedback on different design elements throughout the website timeline process, i.e., getting feedback on graphics, website mockups, etc.
It enables you to minimize misunderstandings and effortlessly get every stakeholder on the same page through contextual feedback.
If that sounds like something you’d like, sign up for a 30-day free trial with MarkUp.io and make the design review and approval process something your team looks forward to.