
You’ve just finished designing a website. You’re ahead of schedule, too!
You submit the final version for approval and optimistically exhale like you’ve been holding your breath the entire project timeline.
Ah, the sweet relief of getting things done!
Or so you thought…
Soon, your inbox is flooded with revision requests .
Ten rounds of haphazard back-and-forth review rounds later aaaand… you’ve officially missed the deadline.
How could it be so hard to get on the same page with stakeholders?
It’s really not, actually.
We’re here to help you create a feedback loop-free web design process so you’ll never be caught in the sticky webs of infinite revisions ever again.
Table of contents
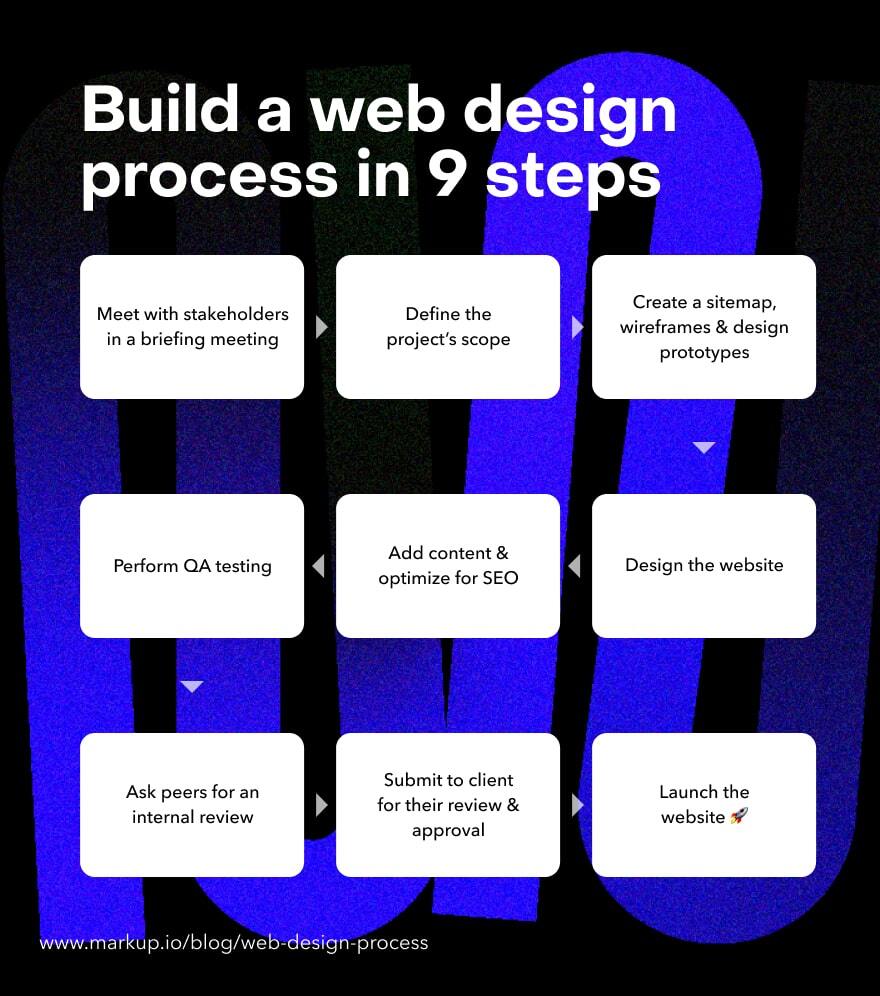
- What is a web design process?
- Step #1: Meet with stakeholders (briefing)
- Step #2: Define the project scope
- Step #3: Create a sitemap, wireframes & design prototypes
- Step #4: Design the website
- Step #5: Add content & optimize for SEO
- Step #6: QA testing
- Step #7: Internal review (optional)
- Step #8: Client review & approval
- Step #9: Launch
- Frequently asked questions (FAQs)
What is a web design process?
A web design process is a standardized, detailed workflow. It outlines all the steps that go into designing a website, from start to finish. Think of it as a step-by-step web design workflow template you can follow every time you’re working on a new website.
An added bonus? Doing so will save you the time you would otherwise spend on project planning.
Plus, having a website design process in place – along with the right tools for each step – helps you speak the same language as your clients and higher-ups.
When your clients are able to work closely with you and your team, miscommunications and frustrating back-and-forths become a thing of the past.
Plus, once your workflow is streamlined, the review and approval process gets more efficient (and less nerve-wracking), and poof! Feedback loops ✨magically ✨ disappear.
Despite the fact that many developers and development agencies constantly lose time to endless rounds of revisions during the review phase, they keep using the same outdated methods (e.g., emails) to collect feedback.
Below, we’re going to explain what’s wrong with this process… and how to do things differently by following nine simple steps.
Step #1: Meet with stakeholders (briefing)
Before you start working on any web development project, you need to know what’s expected of you. And what better way to find that out than a meeting with clients, higher-ups, or other relevant stakeholders?
During the briefing meeting, make sure to clarify any project requirement that was not thoroughly explained to you so you leave no room for possible misunderstandings.
With the stakeholders, you should agree on things like:
- Budget
- Timeline and due dates
- Deliverables and reviews at different stages of the project
- Constraints and risks
- Project goals
- User persona and target audience
- Marketing insights that might help you shape your design
- User experience (UX) and desired customer behavior (i.e., subscription, purchase, etc.)
At this stage, you can make some rough estimates and calculations to determine if the budget allows you to meet the due dates. If not, this issue, along with other potential blockers, needs to be addressed and resolved before you start working.
It could also be helpful to ask your clients to provide you with a list of existing websites they would like you to draw inspiration from. Encourage them to pinpoint specific elements that they like (i.e., fonts, transitions, animations, web page layout, etc.).
Jot down all the details so you can then write a summary of the meeting and send it over via email to all the participants. Documenting the meeting will help you ensure everyone is on the same page.
Further, the summary email will give everyone involved an overview of what was defined right from the get-go. This way, there are lower chances of miscommunications and misunderstandings after you’ve started working on the project.
Step #2: Define the project scope
Based on the info you gathered during the briefing stage, create a project scope so you can share it with your team.
Your project scope should cover details on:
- Deliverables: A thorough description of the website the client wants.
- Task breakdown: Segment the project into smaller tasks.
- Define roles and responsibilities: Assign tasks and let everyone involved know what part they’re playing in creating the project.
- Project timeline: Break down the due date into smaller deadlines for each created sub-task and establish the project’s milestones.
- Map the customer journey: Visualize how website visitors are expected to interact with the website.
- Scope control: Plan for the unexpected. Try to identify possible changes and additional tasks that may arise along the way (i.e., multiple reviews and reiterations).
- Scope review and approval: Get everyone on board with the scope of the project. Encourage them to speak their mind and propose changes now.
Keep in mind that scope creep is no joke! Unexpected change requests can delay the entire project. It’s like dominoes – once one task is affected, the tasks that follow will likely be impacted by unwanted setbacks.
You can fall into this project management flytrap when the project’s requirements keep growing and extra items are constantly added to the to-do list (without following proper procedure).
The only way to avoid all this is to create a thorough project scope and get it approved by stakeholders before you start working on the actual tasks.
Step #3: Create a sitemap, wireframes & design prototypes
Finally, you’ve got your project scope approved and you’re ready to get to work.
Some designers prefer to jump straight to their content management system (CMS) of choice and start the actual web design process at this stage.
Others are more cautious and prefer planning ahead. We’re with them on this one!
It’s super important to create wireframes, design prototypes, and any other preliminary sketches that showcase your vision.
And, you guessed it, get them approved by the client.
Adding yet another review step to your web design process.
But you said the whole point of having a web design process is to get fewer reviews.
Yes! That’s exactly what we’re building to.
Would you rather:
A) Shift some elements around and re-create a mockup
OR
B) Re-design an entire website?
We’re going to assume that nobody in their right mind would want to spend hours on revisions that could have been avoided by involving the client’s feedback earlier in the process.
In addition to helping you reduce review time, design mockups and wireframes also enable you to:
- Have an objective overview of the UX and the ease of use of your website
- Establish conversion paths and link-naming conventions
- Determine the optimal position of buttons, navigation bars, menus, etc.
- Identify issues with the site’s architecture and user interface (UI)
To easily create wireframes, you can use specialized tools like:
- Sketch: A design collaboration platform that helps users with prototyping and developer handoff.
- Adobe XD: An experience design platform for creating responsive website layouts.
- Figma: An interface design tool for wireframing.
- Justinmind: A web design prototyping tool that allows you to create interactive wireframes.
- Photoshop: A graphics editor that helps you create UI elements, mockups, and wireframes.
Author’s tip: Read our blog post on website mockups to learn how to mockup a website in four easy steps.
Depending on which tool you’ve decided to use, you may need a visual feedback tool to submit your mockups for review.
For instance, you can upload your wireframe onto an annotation platform like our very own MarkUp.io.
MarkUp.io enables you to create MarkUps (virtual copies) of your project files and share them with reviewers via link.
Reviewers are able to leave contextual comments with actionable feedback that’s easy to understand and implement.
The bottom line is that combining wireframing apps with collaboration tools helps you complete project planning phase faster. Once your visual design ideas have been approved, you’re free to working on the website as soon as possible.
Step #4: Design the website
All the planning has finally ended!
With the site structure already established and visual style agreed upon, the only thing left to do is to put everything together in your CMS of choice.
Depending on your programming experience with CSS, HTML, and JavaScript, you can either choose a no-code website builder like Webflow, or a more code-heavy platform like WordPress.
In our experience, we’ve found that Webflow makes the design phase easy thanks to its no-code drag-and-drop functionality. This allows you to add elements to web pages without ever needing to see the backend.
So, with an easy-to-use CMS, you’d only have to move elements around a page’s layout until it looks just like the mockup.
Ideally, by this stage, you have been provided with brand guidelines that cover:
- Color scheme
- Visual elements
- Visual style
- Fonts and typography
- Branding elements
However, do note that this might not be the case when working with startups and small businesses. Oftentimes, these companies are still defining their brand identity.
When this happens, you can wing it and let your imagination and expertise go wild. Create a board with color schemes, different fonts, and visual styles and add those to your MarkUp.io workspace.
Share the visual design MarkUps with your clients and prompt them to choose the styles that best suit their brand.
You probably already know that doing so will spare you from later edits. 😉
Step #5: Add content & optimize for SEO
Although search engine optimization (SEO) is vital for ranking in searches, you should create content with the needs of your end user in mind.
After you’re sure the content is created around your audience, you can think of ways to help people find your website when performing relevant search queries.
It’s true that SEO brings your website before the eyes of visitors and potential customers. However, it’s the content that entices them to stay and interact with your brand.
To simplify the content creation process, it’s best to collaborate with an SEO-literate copywriter that can incorporate keywords into content smoothly.
In other words, your SEO strategy should seamlessly combine user-oriented content and SEO elements without affecting the UX.
To create this type of strategy, you should take all three SEO elements into account:
- On-page SEO/on-site SEO: Optimizing the website elements visible to visitors (title tags, headings, website content, meta descriptions, images, etc.).
- Off-page SEO: Improving your website’s visibility with backlinks, social media shares, internal links, etc.
- Technical SEO: Optimizing the loading speed of your website, robot.txt files, the sitemap, canonical tags, etc.
If that sounds like a lot to maintain, worry not! These elements can be easy to take care of with some CMS tools.
For example, with Webflow’s built-in SEO features, you don’t need an plugin to add title tags and meta descriptions to web pages. Moreover, you can even generate some SEO elements automatically based on a template.
Step #6: QA testing
As soon as the content, SEO elements, and everything else are in place, it’s time for quality assurance (a.k.a. QA testing).
The QA process in web development generally tests aspects like:
- Functionality: Checking each feature of the website to ensure it works properly (i.e., testing contact forms).
- Usability: Observing how easy it is for testers to perform certain tasks on the website (i.e., subscribing to the newsletter).
- UI: Testing visual elements to ensure they’re displayed properly.
- Responsiveness: Testing how the website is displayed on different screen sizes (i.e. mobile vs. desktop view).
- Broken links: Clicking on each link and button to ensure no 404 error pages are displayed.
- Performance: Running tests to evaluate metrics like page speed, bounce rate, error rate, etc.
- Security: Scanning the website for vulnerabilities.
Fun fact: you can make QA testing easier with MarkUp.io.
The process is simple. Create a MarkUp of your website (you can create one from your browser with the MarkUp for Chrome extension) and share it with your QA engineers. This way, they can quickly pin comments to elements that aren’t working as they should.
Step #7: Internal review (optional)
The internal review is completely optional, but we encourage you not to skip it.
Even though the website you’ve created has already been through QA, chances are some errors and mistakes slipped through undetected.
Of course, freelancers and solopreneurs will have to skip this step unless they’re collaborating with peers and reviewers as a part of their workflow.
For everyone else, the internal review is an opportunity to have an extra pair of eyes scanning the content, media files, and other elements one more time before the official review with the client.
You can use MarkUp.io at this stage the same way you used it for QA testing:
- MarkUp your website using the MarkUp.io platform or browser extension.
- Share the website MarkUp with reviewers.
- Collect contextual feedback.
- Implement the feedback and resolve the addressed comments.
You’re so close to the finish line! Do you hear the launch countdown beeping?
(Apologies if that song is stuck in your head now! 😬)
There’s only one thing standing between you and the website launch: securing the client’s approval.
So, let’s get that step over with quickly.
Step #8: Client review & approval
After so many reviews and tests, the client approval should go smoothly.
*Fingers crossed*
However, there might still be some small edits required. But nothing structural and difficult to implement.
You should expect some requests on things like:
- Changing font sizes
- Correcting grammatical errors
- Tweaking some content
And other similar edits that take no more than a few minutes to resolve — assuming you’re using a website annotation tool to request feedback.
If your review process is email-based, this stage will take a while longer.
So, spare everyone’s time and add a tool like MarkUp.io to your workflow.
MarkUp.io features a Chrome extension that helps you create website MarkUps with a click of a button. It’s as simple as bookmarking a webpage you love.
As you already know, the MarkUps you create with MarkUp.io are sharable and support pixel-accurate comments.
Pro tip: You can organize all the MarkUps created during all the review and testing stages into Folders on your Workspace.
Step #9: Launch
Depending on your contract and the services your design agency provides, your contract might’ve ended after the client’s approval.
Nonetheless, you probably want to see how users perceive the fruit of your labor.
To track the performance of the website during launch and ensure the launch event is a success, you can:
- Connect the site to an analytics tool
To keep a close eye on the number of users and how they interact with the website, make sure to connect the website to a web analytics tool like Google Analytics.
- Set up your launch for success with a proper launch date
If you have a say in choosing a launch date, make sure to avoid scheduling the event around holidays, festivals, and other happenings that draw a lot of media attention.
You don’t want the launch to be outshone by Black Friday discounts and sales announcements. The same goes for weekends when consumers prefer to be with family and friends rather than in front of a laptop.
- Analyze post-launch metrics
After the launch event has ended, go to your analytics tool and try to identify areas that can be improved.
Look at things like:
- Organic traffic: The number of website visits resulted from search queries.
- Dwell time: The time a user spends on a webpage after accessing it from the list of search results.
- Bounce rate: The number of visitors that leave the website without performing any action.
- Returning visitors: The number of visitors that come back to your website after their initial visit.
- The number of pages per session: The number of web pages a user accesses during their visit to your website.
- Conversions: The number of visitors that subscribe to your newsletter, make a purchase, click a call-to-action (CTA) button on a landing page, etc.
These metrics will give you an overview of how well your website performs.
Enough with the technicalities!
It’s time to put all this into practice.
Over to you
If you’re intimidated by establishing a web design process that works for you, don’t worry!
We’re here to help you every step of the way.
Start your free 14-day trial with MarkUp.io to get your web design projects approved quickly and easily!
Frequently asked questions (FAQs)
Q1. What is the goal of a web design process?
The goal of a web design process is to streamline the design workflow and provide a tried-and-tested method to work on website design projects with as few iterations and revision requests as possible.
Q2. How do you create a web design?
To create a web design, you can use no-code website building platforms like WordPress, Webflow, Squarespace, etc.
For example, with Webflow you can create website designs easily using the platform’s drag-and-drop functionality.