
Whew! You’ve finally managed to wrangle your team into one room, all pumped up and ready to strategize your next power move.
After what feels like an eternity of brainstorming and an army of empty coffee mugs, you’ve nailed it!
The consensus? Design thinking is your golden ticket to innovation. ✨
But, here’s the kicker – nobody knows where (or how) to start. Sure, you know the steps, but putting them into action?
GIF Source: Tenor
But don’t sweat it! You’ve landed on this article – your beacon in the fog of confusion.
This guide will unpack every tool you’ll need, covering each step of the design-thinking process. From tools to help you empathize, to others for prototyping, we’ve got the whole shebang.
By the end of this guide, you’ll be navigating design thinking like a pro, bringing your innovative ideas to life with gusto! 💪
Table of contents
Tools to empathize
You’re in the biz of cooking up new ideas or products that your customers can’t resist, aren’t you?
But to whip up that magic, you first need to understand your customers’ needs. Get into their shoes and ask:
- What challenges are my potential customers facing?
- What’s on their wishlist?
- How familiar are they with this problem?
In simple terms, it’s through talking to your audience that you gather insights. The following tools help you hit the mark with a human-centered design. 💡
Tool #1: UXtweak
UXtweak is a user research software. It features tools to help you understand what users need, do, and feel. How? By conducting surveys, preference tests, and session recordings.
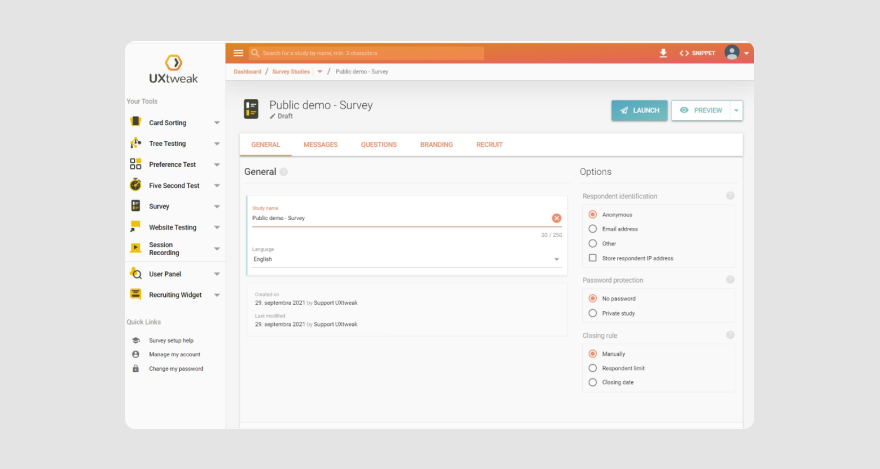
If you have an existing audience, you can share the research link with them any way you choose.
And if you don’t, UXtweak has a pool of participants you can recruit for the research.
Pros:
Here are some of UXtweak’s advantages:
- Extensive user insight showing how users (might) interact with your solution.
- A user-friendly interface makes it easy for UX experts and beginners alike to use it.
- User-behavior tracking so you can identify the audience’s pain points.
- Make better decisions using the data from your study.
Cons:
While UXtweak is quite an effective tool, it does have some drawbacks:
- Cost. The price of UXtweak is quite high, especially for teams with small budgets.
- Learning curve. It might take you time to learn how to use some of UXtweak’s advanced features.
Pricing
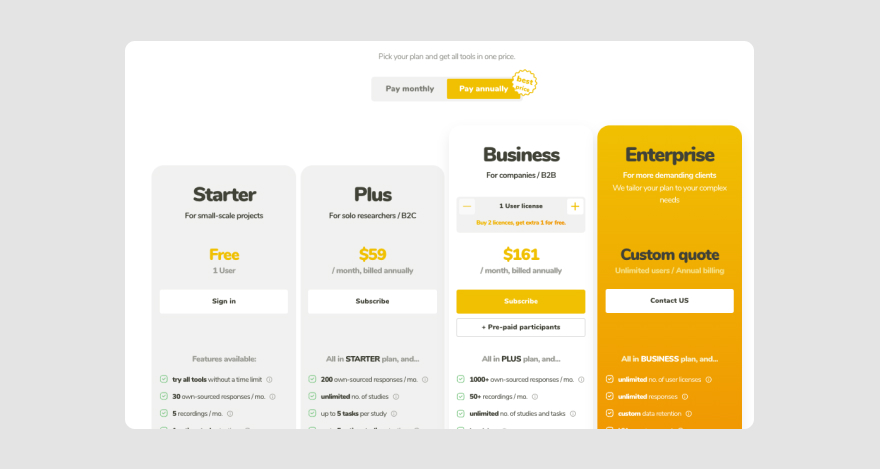
UXtweak has four pricing plans to choose from.
- Starter plan: Free.
- Plus plan: $59/mo.
- Business plan: $161 per user license/mo.
- Enterprise: Available on request.
Tool #2: Hotjar
Hotjar is another tool you can use to empathize with your audience. It helps you learn about your users’ experiences. Plus, you’ll see what they’re going through in real time.
Hotjar uses surveys and a feedback feature.
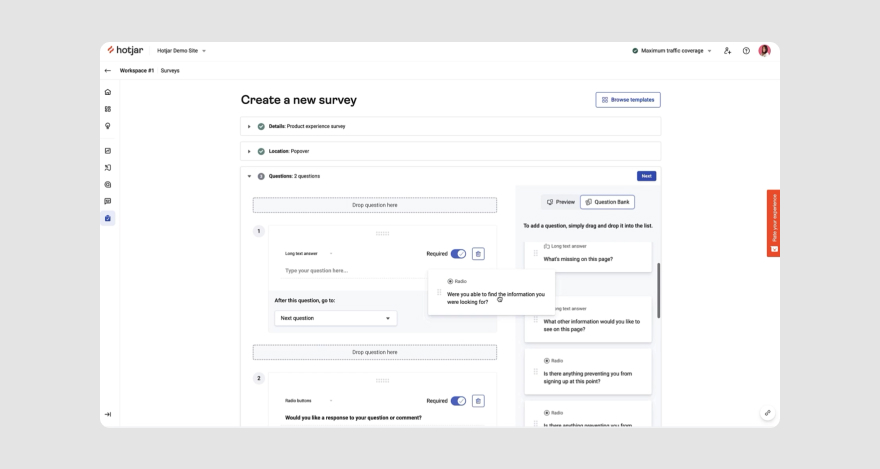
This way, you won’t have to guess what users need and you can approve ideas based on their input.
Use Hotjar’s heatmap to visualize a user’s experience with the product. If your goal is to improve a new product, that is.
You’ll get to know how they behave and what their challenges are so you can resolve them.
Pros:
Here are some good things about using Hotjar:
- Providing an overview of user behavior and needs.
- Visual representation of data obtained from users.
- Easy implementation so it’s accessible to even first-time users.
- Recruiting test users to participate in surveys.
Cons:
- Difficulty labeling recorded data.
- Can be challenging when editing the final results.
Pricing
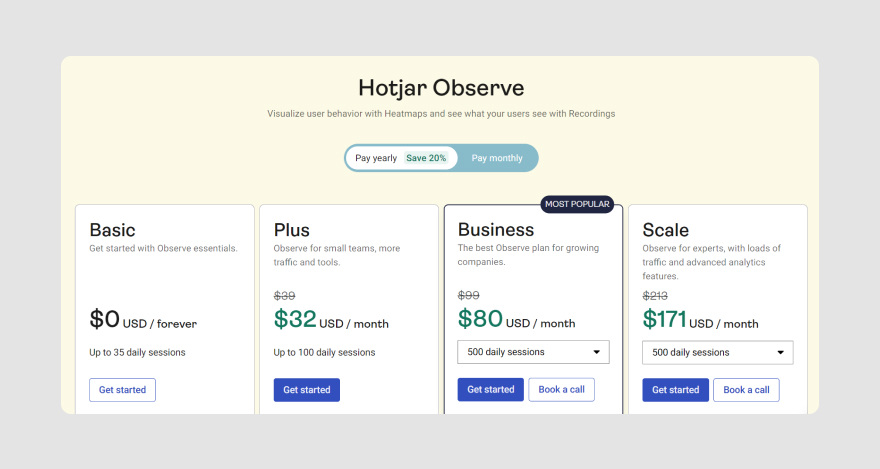
Hotjar offers pricing plans based on the solution you want to use. More specifically, they’ve got a free Basic plan and three paid versions starting at $32/mo.
***
You’ve crossed the starting line and completed the first leg of the race. But hang on, the adventure is just starting to heat up! 💥
The tools we just went over are like personal detectives, gathering intel on your users’ experiences. Now, we’re moving into a pivotal moment for your project.
That’s right. The ‘define stage.’
This is where you’ll play detective, analyzing and fine-tuning the valuable data you’ve collected. Let the data-crunching begin! 🕵️♀️📊🚀
Tools to define
You’ve uncovered the obstacles your users are wrestling with, but have you given those problems a name? 🤔
You see, understanding your audience’s challenges is just the first step. The real deal? Being able to articulate it in a way that resonates with others.
Here are a couple of handy tools that will help you do just that. 🛠️
Tool #3: Make My Persona
Make My Persona is a digital tool by HubSpot that can help you organize customer data to build a buyer persona.
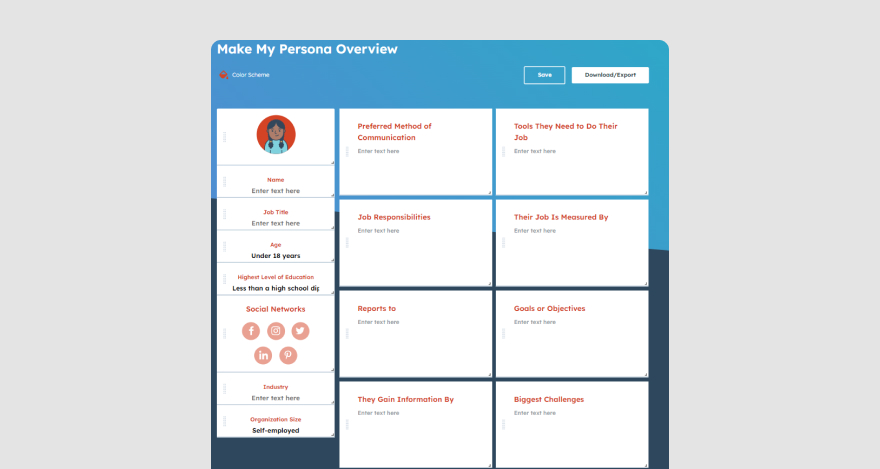
How to create a persona, you ask? It’s all about solving the right riddles. Ponder on your user’s greatest challenges. Consider the tools they rely on in their work.
Pro tip: The answers to these riddles are hiding in plain sight – in the results of your previous research. 🕵️♀️
Once you’ve got all your ducks in a row, you’ll be rewarded with a colorful snapshot of your audience’s problem.
Pros:
What are some benefits of using HubSpot’s digital baby?
- It’s direct and easy to use.
- It’s fully customizable.
- It requires very little manual work from users.
Cons:
How about some drawbacks?
- It may not be as effective if you’re building personas for complex projects.
- There’s no dedicated customer support.
Pricing
Make My Persona is free to use and allows you to generate as many personas as you need for your projects.
Tool #4: EnjoyHQ
A chill-out zone where you can simply kick back and let off some steam?
Where do I sign up?! 😅
EnjoyHQ is a define-stage tool. Design teams use it as a centralized location for user-research data. They can easily search through the platform to find the info they need.
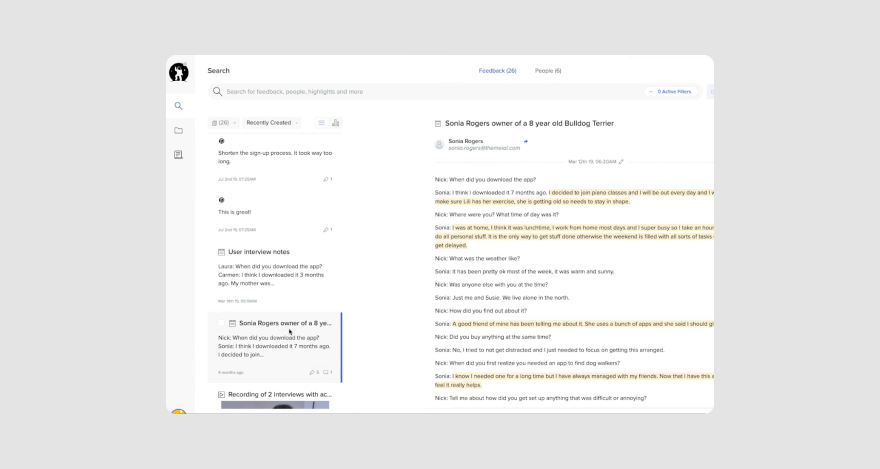
In other words, you’ll have all the data from the empathize stage in a single location. To make it easier, generate visual reports of your research findings. Analyze them so you can define the actual story behind the research.
Pros:
With EnjoyHQ, you can:
- Import research from external tools.
- Organize user data.
- Provide access for your entire team (brainstorming sessions or not).
- Discover new patterns from your research, build mind maps, and design empathy maps too.
- Connect findings from previous research to current ones.
Cons:
Some of its cons are:
- The initial setup might require some extra effort.
- Getting accustomed to the tool’s features will likely take some time too.
Pricing
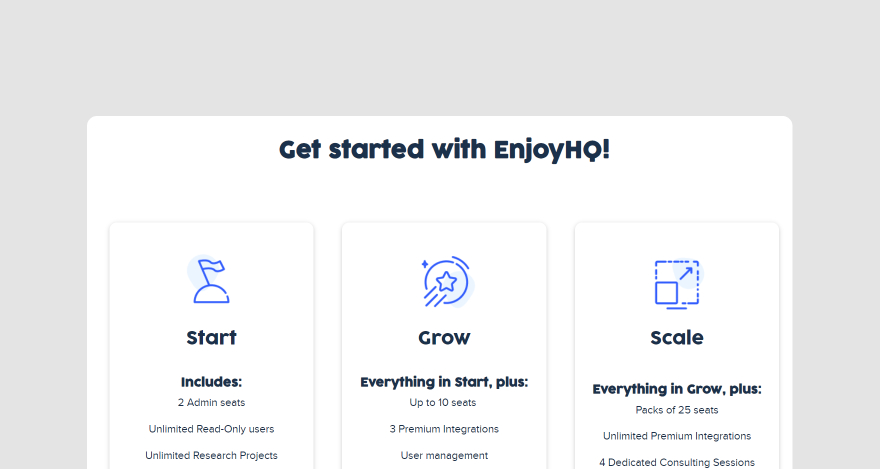
EnjoyHQ offers three pricing plans — Start, Grow, and Scale. The Start plan is free to use, but for the others, you’ll need to contact EnjoyHQ’s sales team to know their prices.
***
At this point, you’ve identified your target audience’s major problem. The next step is to come up with possible solutions.
Let’s look at tools that can help you make that happen.
Tools for ideation
Ready to dive into the third stage of the design-thinking process?
This is where you rally the troops and put your creative hats on. Your mission? To cook up fresh solutions that’ll satisfy your users’ cravings.
Here are two tools we recommend:
Tool #5: Ideaflip
Ideaflip is a digital sticky note tool you can use for brainstorming ideas, mind mapping, and project planning.
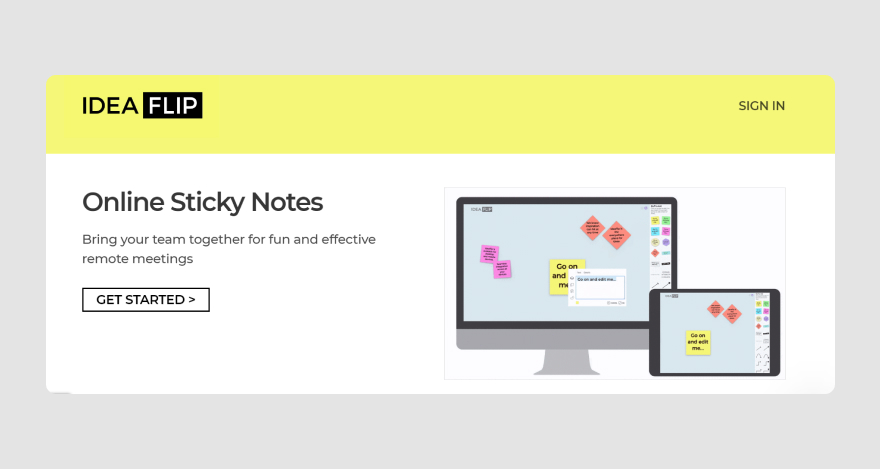
The platform has different templates you can use to get started. It lets collaborators jot down ideas as they appear.
You know the whiteboard with sticky notes you use during an in-person meeting? Now imagine a virtual version.
Pros:
Aside from bouncing ideas around, here are other advantages of using Ideaflip.
- Seamless collaboration with teammates and even guests.
- Templates to help you streamline different processes.
- Comments so you can write notes for instant feedback.
- Guides to set you on the right track when getting started.
Cons:
- There are no integrations with other tools which might affect your workflow.
- You need to be online to work on your ideas or brainstorm with others.
Pricing
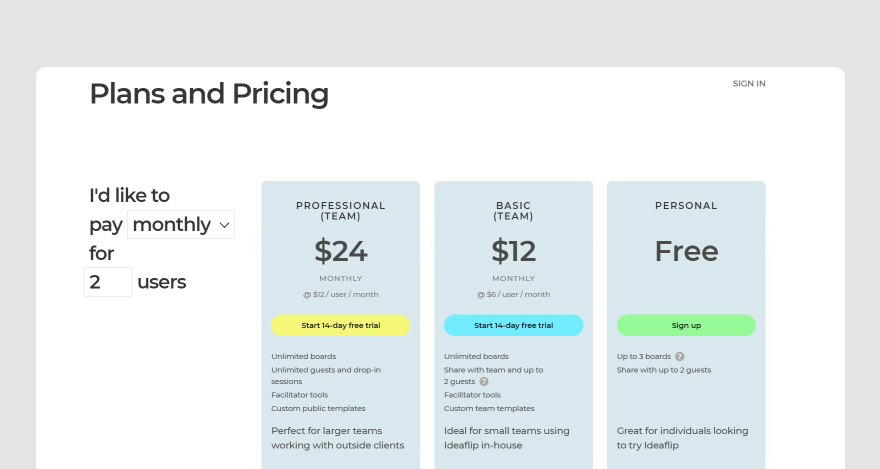
Ideaflip has four pricing plans:
- Personal plan: Free
- Basic plan: $6 per user/mo.
- Professional plan: $12 per user/mo.
- Enterprise: Available on demand.
Tool #6: Stormboard
Stormboard is a visual collaboration workspace you can also use for brainstorming and generating new ideas.
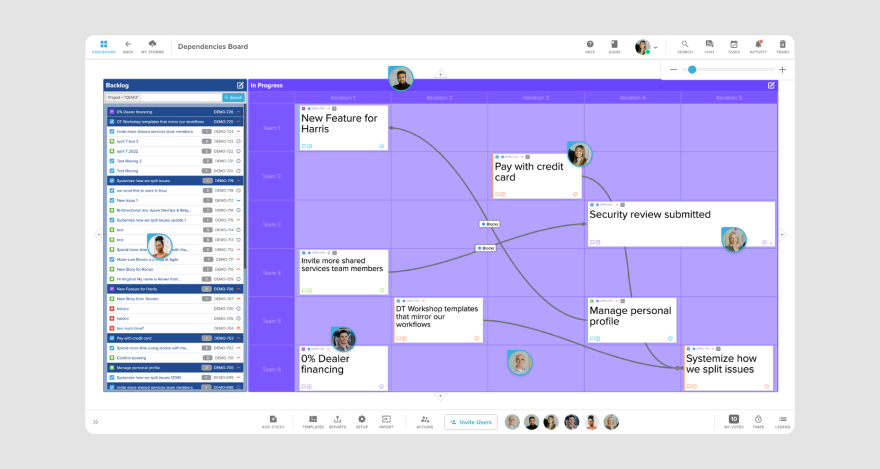
With Stormboard, you can add ideas such as text, images, videos, or freehand drawings. Plus, you get to arrange those ideas any way you see fit on the visual platform.
Pros:
This research tool is a real game-changer, and here’s why:
- Ready-to-go templates that let you dive right in.
- Line connectors that make keeping track of your workflow a breeze.
- A built-In timer to keep your brainstorming sessions snappy and on schedule.
- A voting feature so you can cherry-pick the best ideas and make quick decisions.
- Customizable reports you can whip up after a session.
- Integration with third-party apps like Slack, Google Drive, and Zapier.
Cons:
- You may have to pay extra for some integrations.
- You may need an integration if you wanna use graphs or charts.
Pricing
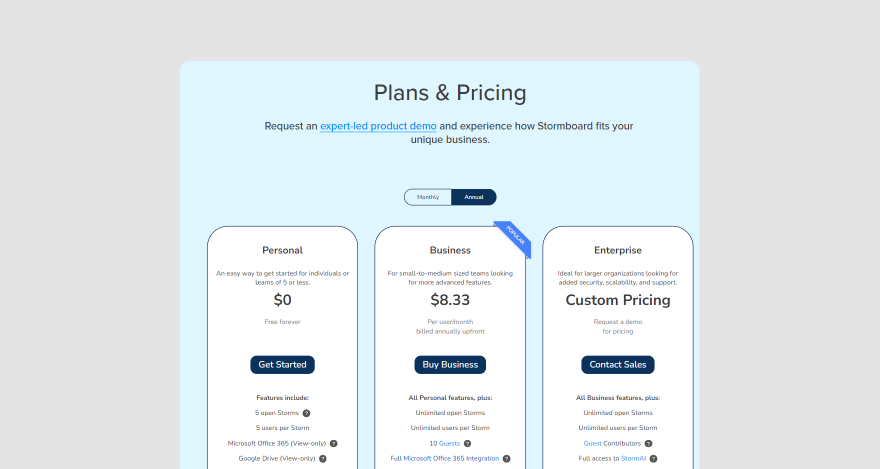
Stormboard comes with a free Personal plan and two paid versions starting at $8.33 per user, per month.
With potential solutions out there, you now have a good idea of what to create.
But to do that, you’re gonna need a prototyping tool.
Tools for prototyping
You’ve heard from the masses and brainstormed a solution that should tick all their boxes. But, will it stand up to the real-world test?
That’s where prototypes come in — an interactive mockup of the product that design users can test.
Let’s look at a couple of handy tools for when you reach this stage.
Tool #7: Figma
Figma is one of the best design platforms for building UX designs, mockups, wireframes, and prototypes.
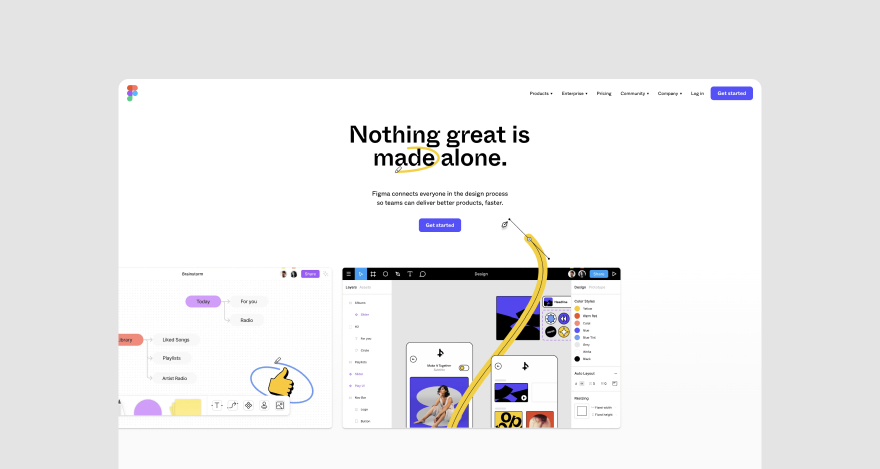
Figma helps you create high-fidelity realistic experiences. But it also defines interactions. Plus, you can add animations too!
Simply put, you can take ideas from product design to interactive prototypes on Figma.
Wanna learn how to use Figma? We’ve got an easy guide to it!
Pros:
All the cool kids are using Figma for design and prototypes. Here are some reasons why:
- Work on projects simultaneously through real-time collaboration. Go teamwork! 😉
- You can share design files with ease since everything is stored in the cloud.
- Figma has a simple user interface.
- You’ll have access to customizable templates based on what you want.
Cons:
- You have to be online to enjoy Figma even if you download the desktop app.
- It might be a little difficult to learn how to use it at first.
- Sometimes, browser caches might affect your workflow but that’s just because Figma is web-based. A simple refresh will get you back on track.
Pricing
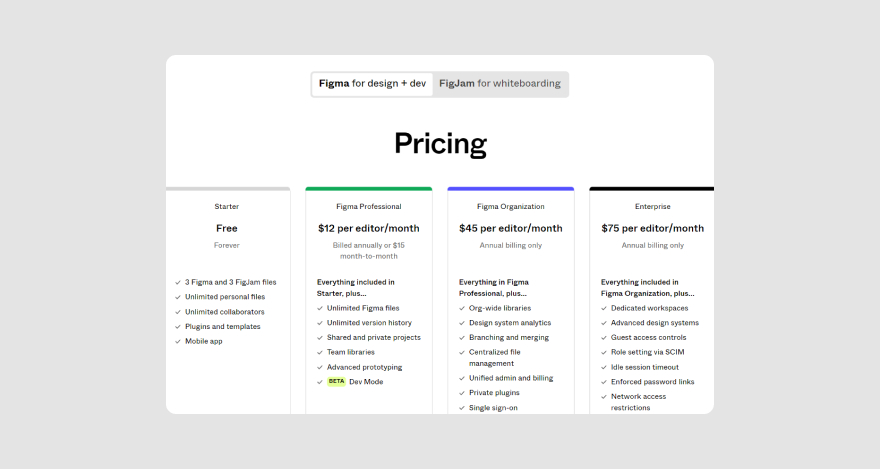
Figma’s pricing plans cost between $12 to $75 per user, per month. But there’s a free Starter plan that offers some basic functions you might need.
Tool#8: InVision
InVision is another design tool that product management teams can use for design, prototype, and animation.
The tool has several features. Gesture picklist. Playback. Point-and-shoot. And many others to help you create interactive prototypes.
Plus, you can preview the prototype within the platform and iterate if needed.
Pros:
Here are some advantages of using InVision:
- Integration with other tools like Adobe, Slack, etc.
- You can collaborate and give feedback on designs.
Cons:
- InVision doesn’t support real-time collaboration.
- Loading sometimes takes a little time.
Pricing
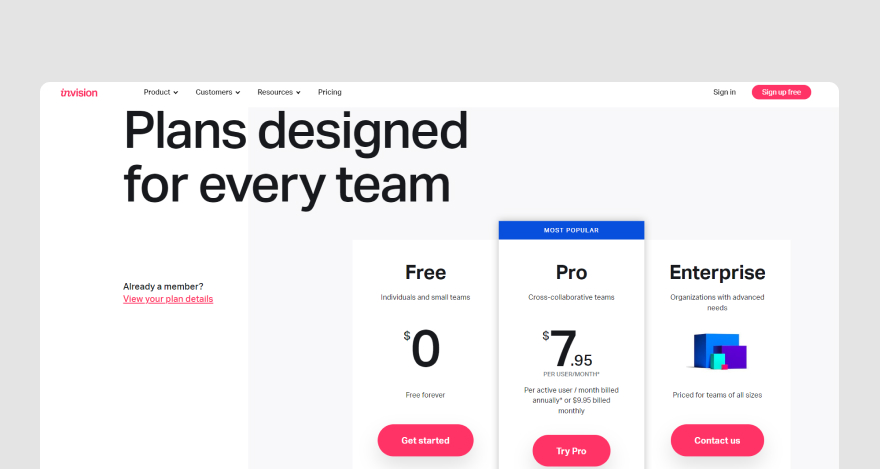
InVision pricing plan starts at $7.95 per user, per month for the Pro plan. They’ve also got a free plan and an enterprise tier available on request.
***
The prototypes whipped up in the almost-there stages of design thinking give users a sneak peek of the product’s look.
But, we need to go deeper! It’s crucial to test these prototypes to get a taste of the user’s experience.
And that, my friends, brings us to the grand finale of our innovation journey — the testing stage. 🚀
Tools for testing
Usability testing is your golden ticket to figuring out if your prototype is ready to graduate to a full-fledged product.
It’s also how you confirm if it truly solves the end users’ challenge.
Let’s introduce a couple of nifty tools that’ll level up your design-thinking toolkit.
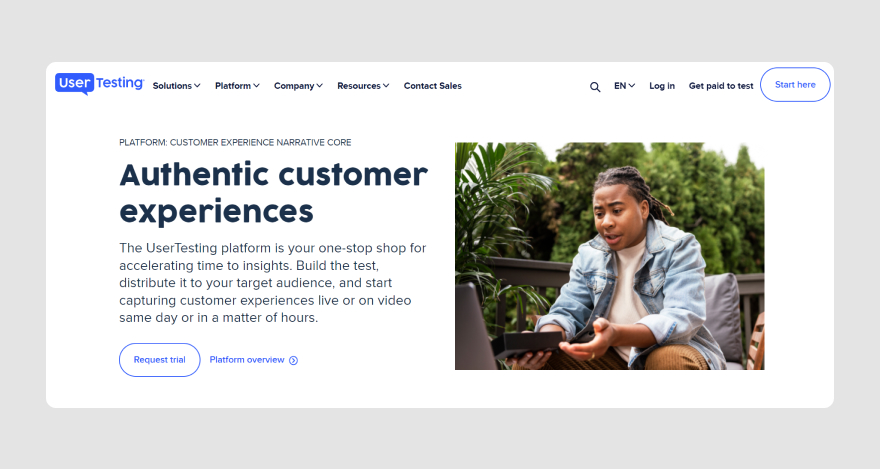
Tool #9: UserTesting
UserTesting is among the top user research and insight software on the market.
You can use it to test any product on any audience and capture their experience via video. From there, you can even create a customer journey map so you know if the prototype was a hit or a temporary miss.
You can also integrate UserTesting with the prototyping tools we mentioned earlier in this guide. It makes it way easier to test your design.
Pros:
Is there any fun benefit in using UserTesting? Let’s see, UT offers a:
- Drag-and-drop tester to help you build tests.
- UserTesting contributor network to help you test if you don’t have an existing target audience.
- Video-recording session that captures users while they interact with your prototype.
Cons:
- UT can be a bit frustrating when setting up a test for the first time.
- Some in-app testers may not always offer the in-depth customer experience you need.
Pricing
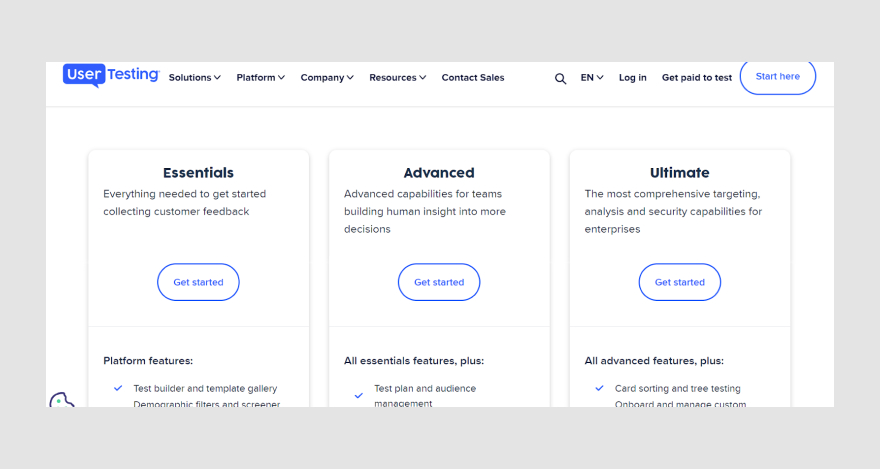
UserTesting has three pricing plans — Essentials, Advanced, and Ultimate. But you’ll have to speak with one of their account guys if you need a quote.
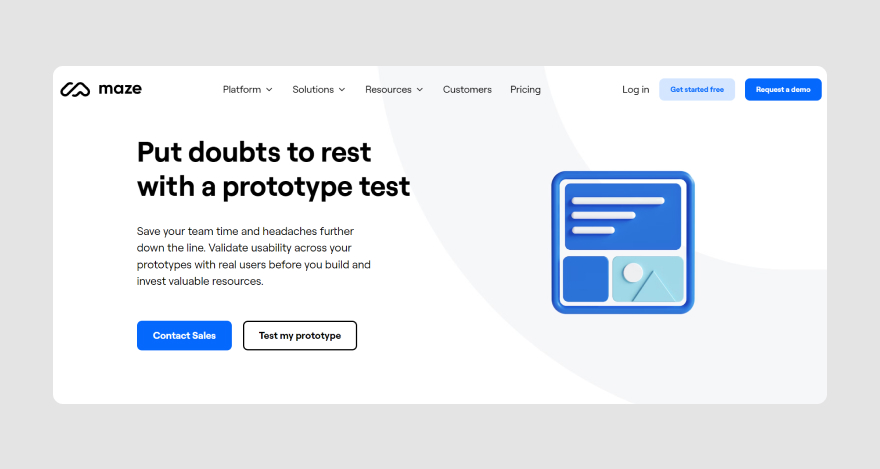
Tool #10: Maze
And then there’s Maze. Our last tool in the design-thinking framework.
Maze is mainly a product discovery software. But you can use it to test your prototypes.
It’s also integrated with prototyping tools, allowing you to collect users’ feedback easily.
Maze gives you access to insightful metrics. Things like usability score or misclicked percentage.
Why are they important? Because you can make more informed decisions, especially when meeting with stakeholders.
Pros:
Here are some advantages of using Maze:
- Leverage heatmaps to learn how users navigate the prototype.
- Access design metrics.
- Archive downloadable reports in your storage.
Cons:
- Users might find it difficult to load the prototypes they’re testing.
- Even though Maze has a simple interface, it may be challenging to navigate for testers.
Pricing
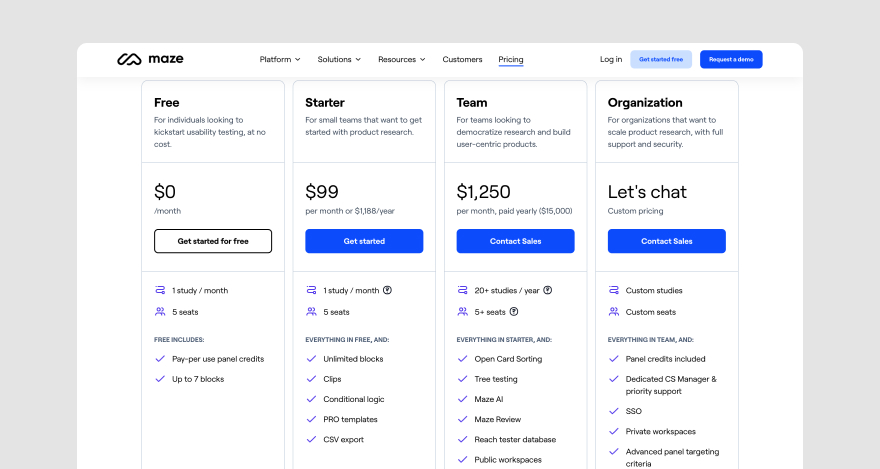
Maze has a free plan and three paid versions starting at $99 per month. There’s also a customized organization plan available on demand.
***
There you have it — all the tools you need for each design-thinking stage.
We’re crossing our fingers (and toes!) that you’re now fully equipped to cook up some innovative solutions for your team.
Your turn, trailblazer
It’s time for us to part ways as you embark on a more inspired design-thinking voyage. 🚀
But remember, if you ever find yourself in a feedback pickle or need a little guidance on your journey, MarkUp.io has got your back.
Need a second opinion from your colleagues or stakeholders? Got a tricky problem to crack?
Our collaboration tool makes it a breeze to test out various prototypes. We play nice with all kinds of content – PDFs, SVGs, MP4s, PPTs, you name it.
Simply upload your masterpiece, invite users to dish out their reviews, and voila! You’re swimming in valuable feedback to perfect your design.
To get the ball rolling, just sign up with MarkUp.io – and guess what? It won’t cost you a dime! 🙌
Easy peasy lemon squeezy!