
Most MarkUp.io users are old pros at reviewing live websites on the platform.
But what if you need to leave feedback on a PDF? Or markup an outdated logo? Or *gulp* a five-minute video?
MarkUp.io is at your service, now with even more powerful features.
On top of an array of fantastic feedback features, the platform also integrates with popular tools like Zapier and Slack, allowing you to streamline your review process by connecting with other apps you already use!
This post will show you how to mark up multiple formats and anything else your heart desires with a handful of new integrations and just one simple tool – MarkUp.io.
Table of contents
- How to create a Website MarkUp
- How to create PDF MarkUps
- How to create Video MarkUps
- How to create Image MarkUps
- Other content you can markup
How to create a Website MarkUp
The OG MarkUp – this is the first type of MarkUp we created waaaaay back in 2020.
Ceros, our parent company, had identified inefficient feedback loops as huge roadblocks to the digital design process. MarkUp.io was created to solve this problem.
Within three months of launching, the platform had attracted more than 2,600 users looking for an easier way to give and receive feedback on digital content.
Without the need for screenshots, PDFs, emails, phone calls, signing away the rights to your first-born child, etc.
Today, Website MarkUps are the number one format created in MarkUp.io. But users don’t stop there—many create Website MarkUps in combination with other formats.
After all, you can’t build a new website for a client and populate it with nothing. Because of this, many users are busy reviewing the graphics, videos, eBooks, and other assets that will appear on the site before a Website MarkUps is even built.
Who creates Website MarkUps?
- Account or project managers at creative agencies managing rebranding projects.
- Web design agencies or freelance web designers building websites and supporting assets for clients.
- Development teams doing website QA testing.
- Remote design teams working asynchronously.
- Web agencies managing and monitoring clients’ websites for issues.
You can create a Website MarkUp in one of two ways:
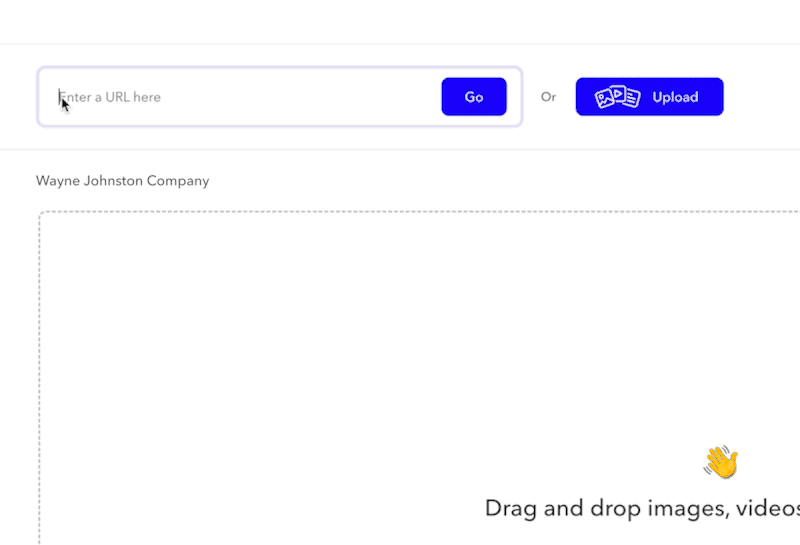
- Placing a URL in the MarkUp.io app (either a live URL or a staging site) and clicking Go.
- Using the MarkUp for Chrome extension (downloadable here)!
Downloaded the Chrome extension yet? Awesome. 😏 Here’s how to create a Website MarkUp directly from your browser:
- Open Google Chrome, then navigate to the webpage or website you’d like to markup.
- Open the extension and click Create MarkUp. The Website MarkUp will open in a new tab inside MarkUp.io.
- Start leaving comments!
To quickly share your brand-new Website MarkUp with impatient stakeholders (or remind your client they owe you feedback on a website project), send it by email or use the share link.
Website MarkUp best practices:
Comment vs. browse. When you open a MarkUp, you automatically enter Comment mode. Click anywhere on the Website MarkUp to leave a comment (AKA dropping a pin).
Uploading your website to the MarkUp.io app means the entire website becomes one Website MarkUp. You can switch to Browse mode to navigate other website pages while staying inside the same MarkUp.
If you want to see the pins in your MarkUp while browsing, click ⚙️ to enable Show pins in browse.
MarkUp shortcut: Press 1 or 2 on your keyboard to toggle between Comment and Browse.
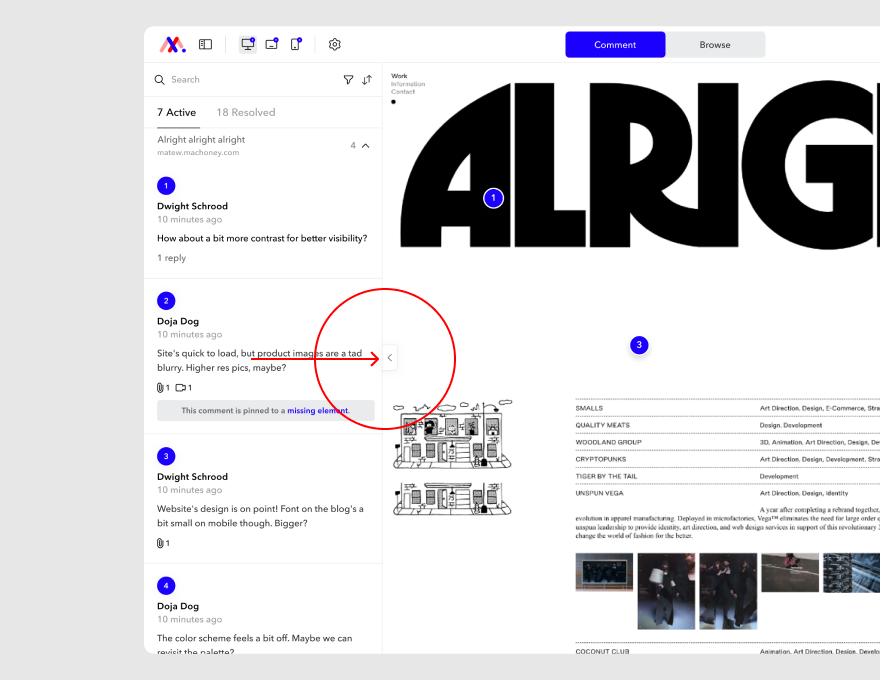
Get context for what your stakeholder sees. Comments live in the Comment Panel on the left side of your screen. You can open and close it by clicking the arrow, like so. 👇
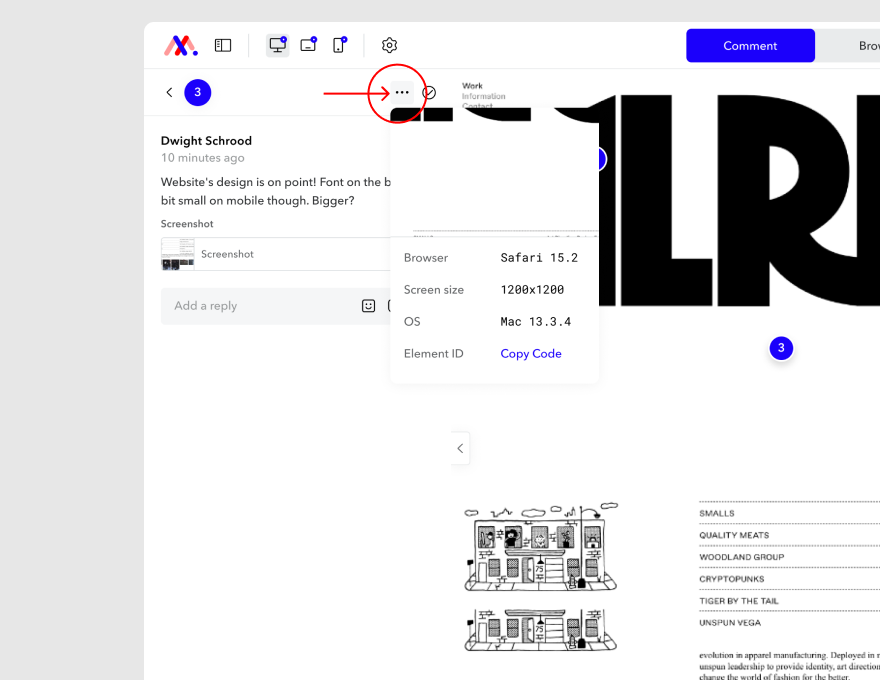
Each comment reveals the browser, screen size, and operating system your collaborator is using.
Let’s say your client keeps asking where you put their logo on their new site. After receiving this comment five times in a row, you click on the three dots at the top right of your comment and select Get info. Now, you can see that your client has been reviewing the site on a mobile device (which explains why they keep missing the logo each review cycle 🙄).
TGFC – Thank God for context!
Device previews. All MarkUps open in the default Desktop preview.
We’ve recently improved the interface, so Tablet and Mobile previews more accurately represent your site’s appearance in each breakpoint.
Click the icons at the bottom left of your screen to leave comments in different views. You’ll also see if new comments have been left on different device views.
Note that comments you leave in one preview don’t appear in the others. So, if you leave a comment on the Mobile preview, don’t expect to see it duplicated in the Desktop and Tablet previews.
Check screenshots for context. When you leave a comment on a Website MarkUp, the pin’s location automatically attaches as a screenshot.
Installing the Chrome extension enables MarkUp.io to create a screenshot instantly. If you or your reviewers don’t have it installed, a screenshot is still taken; however, uploading takes one to three minutes.
These screenshots are handy when tracking revision history or when updates have been made to your website that removes the element the comment was pinned to.
For instance, let’s say you’ve been working on a staging site that’s finally live. When the URL changes, comments in MarkUp.io may be disconnected from the original elements they were pinned to. This also happens when a pin is behind animated, hidden elements. 👇
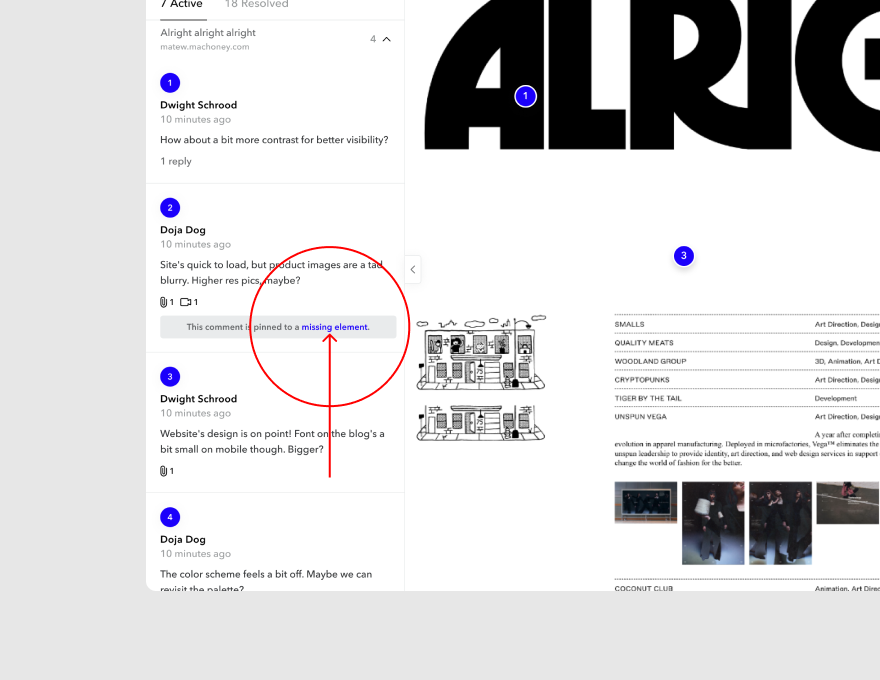
When you get these error messages, click the screenshot attached. It’ll show you where the pin is located.
Use our Zapier integration. When working on a web project, you’ll often find that your workflow gets cluttered with repetitive tasks. So why not automate away the most time-consuming ones — with MarkUp.io’s Zapier integration!
Zapier is an incredibly useful automation tool that allows you to integrate MarkUp.io with a whopping 5,000+ web applications. So, you can automate tasks like adding new Website MarkUp comments to a Google Sheets document, without having to write a single line of code.
Interested to see what MarkUp.io tasks you can automate with Zapier and how to get set up? Check out our Help Center for more info.
How to create PDF MarkUps
Reviewing a digital PDF can be … frustrating, to say the least.
Collaborating digitally on PDFs can be time-consuming if you and your collaborators aren’t using the same annotation tools. Before long, you’re on the final_FINAL_revised_4_done version, and you’re still missing feedback sent via a stray email or buried in a Slack thread lost to the sands of time.
Who is creating PDF MarkUps?
- Editorial teams producing print spreads for magazines, catalogs, and the like.
- Freelance design professionals updating a client’s sales collateral with new branding.
- Creative agencies producing internal documentation that improves the employee experience.
Here’s how to create a PDF MarkUp:
- Upload a PDF file to your MarkUp.io Workspace.
- Click Create MarkUp.
- Start leaving comments!
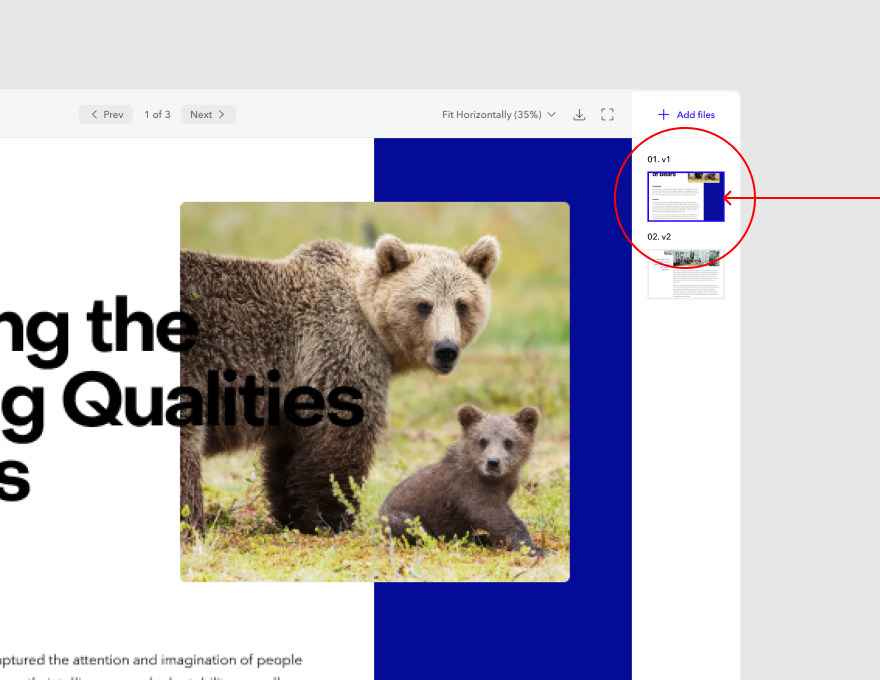
Like Image MarkUps (which we’ll talk about later), you can create a PDF MarkUp with a single PDF or multiple pages. You can also reorder pages and delete them as needed.
PDF MarkUp Best Practices
Consistent zoom level. If you’re reviewing a PDF with multiple pages, you can adjust the zoom level by clicking the percentage icon in the top right corner of your MarkUp. Once selected, the view will stay consistent across pages and is stored in the session.
MarkUp shortcut: Use the scroll feature on your mouse to zoom into MarkUps with 📍pinpoint📍 precision.
Individual page download. To download a single page from the PDF MarkUp, click the download icon in the top right corner. This can be helpful for version control (or if your stakeholders prefer to download that page, print it out, and… you know… mark it up by hand like it’s 1999 😒).
Convert unsupported file types to PDFs. While MarkUp.io supports 30 file formats, sometimes you need to review something that isn’t on our list. Let’s say you need to get feedback on an XLS spreadsheet. You can convert it to a PDF, upload it as a PDF MarkUp, and get comments like you would on our supported file types.
Establish your feedback process before PDF collaboration begins. While we recommend doing this with each and every project you take on, it’s especially important when working with PDFs. Ensure stakeholders understand they don’t need to download additional software to comment on PDF MarkUps. Additionally, make sure you keep all reviews on MarkUp.io – otherwise, you’ll find yourself fending off PDF reviews from different channels (ultimately defeating the purpose of working in MarkUp.io).
How to create Video MarkUps
Video MarkUps have been a hit with users since their release in 2022. This feature has been so popular that the number of Video MarkUps created in the past year has quadrupled since its release!
Users have been busy reviewing Video MarkUps of social media content, corporate videos, and more. They can be created from the following file types: MP4, MPEG, AVI, WEBM, Apple ProRes, MKV, MXF, OGV, TS, 3GP, and 3G2.
Who creates Video MarkUps?
- Youtube content creators releasing new videos consistently.
- In-house marketing departments producing video ads.
- Teams creating content for social media.
- Customer success teams creating educational videos like product demos and how-to videos.
- In-house editors creating educational videos for employee onboarding.
- Corporate communications departments using videos to promote company announcements, updates, and the like.
Here’s how to create a Video MarkUp:
- Drag and drop or upload your video to the MarkUp.io platform.
- Click Create MarkUp (you can continue working on other MarkUps while your video uploads). 👍
- Open up your new Video MarkUp, hit play, and start leaving comments!
To comment on a Video MarkUp, click the specific frame of the video where you’d like to add feedback (the video will automatically pause).
You can add as many comments to your video as needed, including multiple comments in a single frame. 💯
We’ve also just released an improvement that allows users to upload videos larger than 5GB. MarkUp.io users can upload 100GB of content daily to the platform, while Pro plan users have 500GB of storage space.
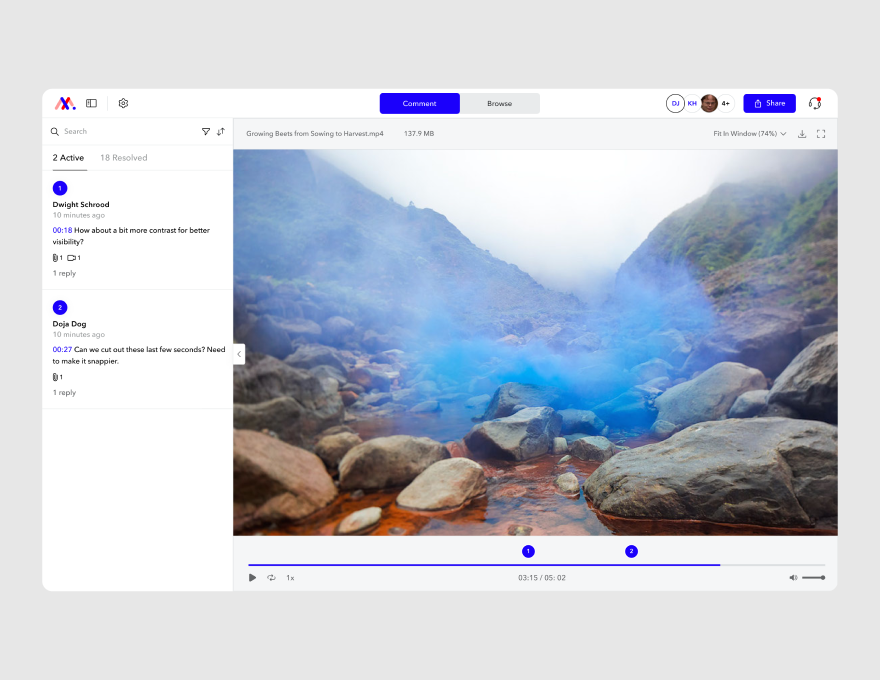
After you add a comment, you’ll see a timestamp in the left sidebar. Click on it to return to the frame where your comment appears.
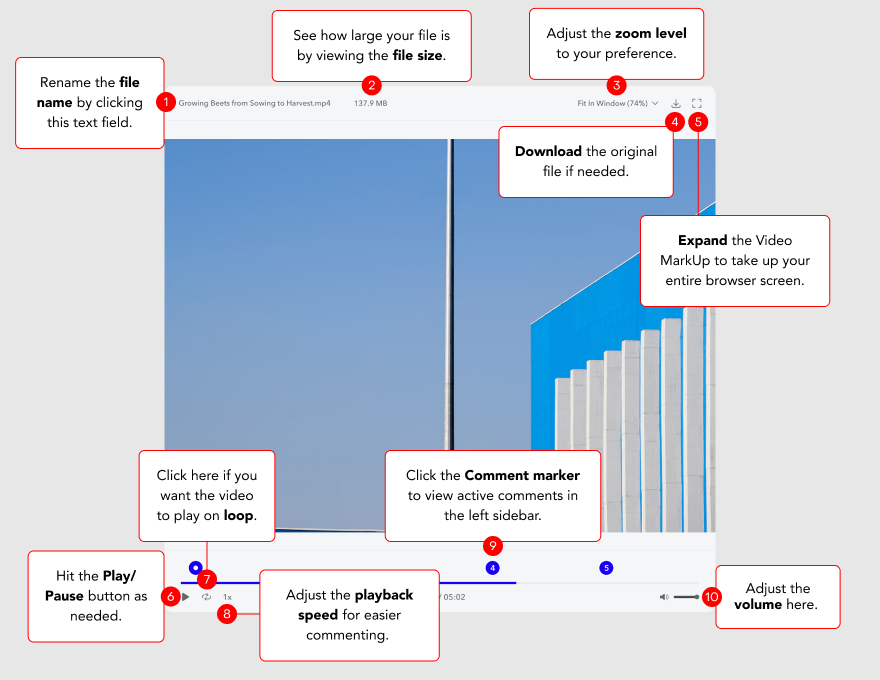
Navigating the Video Player
Leaving comments on Video MarkUps is easy, but make sure you’re getting the most out of the platform’s video player. Here’s how to get around:
Best practices for Video MarkUps
Use the comment panel for debriefing. After resolving all comments on a MarkUp, be sure to revisit them in the Resolved tab. This way, you can be sure you’ve implemented each and every edit request.

Use MarkUp.io to organize your workflow. With Folders, you can manage all aspects of your video production workflow in one app. For instance, you can manage pre-production planning by dedicating a Folder to aspects of pre-production planning like creating moodboards and reviewing storyboard PDFs.
MarkUp hack: if the footage you’re working with is top-secret, our Enterprise plan is calling your name (not in a creepy way 👻). Enterprise users can set up SSO and ensure only authenticated account members have access. Contact us to learn more!
Encourage collaborators to review videos while on their desktops. Although you can use the MarkUp.io app on your mobile device, we always recommend accessing the platform from your desktop for the best user experience. This is especially true for Video MarkUps; who knows what details you’ll miss reviewing Video MarkUps on a small screen?
How to create Image MarkUps
Last – but certainly not least – is the Image MarkUp.
Who is creating Image MarkUps?
- Web design agencies sharing wireframes or website mockups with clients.
- Freelance graphic designers working on branding elements like logos and other designs.
- Ad agencies proofing ads before publishing them to ensure they catch all errors.
- Teachers providing feedback on presentations, art projects, and other visual assignments submitted by students.
Here’s how to create an Image MarkUp:
- Upload any JPG, JPEG, SVG, PNG, GIF, BMP, PSD, or AI file.
- Start leaving comments!
You can create an Image MarkUp with one or multiple files. Simply drag and drop multiple files at once to create one Image MarkUp. Like PDF MarkUps, you can reorder images and delete them as you see fit.
Image MarkUp Best Practices
Automatically adjusted zoom level. When reviewing a batch of different-sized graphics, select the Fit In Window option at the top right of your screen. Now, you won’t need to continuously adjust the zoom level as you flip through images.
Store style guides on MarkUp.io. If you’re working with multiple clients, keeping all their branding guidelines straight can get a little confusing. That’s why some of our users utilize Folders to organize their Workspace by the client. Within each client’s Folder, upload their style guide so you have everything in one place and your team can easily access it anytime.
Keep revisions in one Image MarkUp. Since you can add more graphics to an Image MarkUp after its creation, there is no need to create a new Image MarkUp for each revision round. Implement a simple file-naming convention to know which iteration you’re on for each image.
Attach and share any file type to comments. This feature isn’t specific to Image MarkUps but is especially useful when iterating visual designs. Encourage stakeholders to attach examples of imagery to comments to convey the look they’re going for. Further, if a logo or other branding asset on their end changes, they can upload it to the Image MarkUp so your team will have it immediately.
MarkUp shortcut: Use the trackpad to zoom in and out of Image and PDF MarkUps, and pan around in all directions.
If you hold down the spacebar, you’ll notice that your cursor has transformed into a hand, allowing you to click and drag while panning. Voila! You now have better control when navigating your MarkUp.
Use our Slack integration. When the clock is ticking and you’ve got a ton of Image MarkUps to review, you won’t always have time to chase up your stakeholders through endless emails. So bring the conversation to where they communicate the most — with MarkUp.io’s Slack integration!
This delivers MarkUp notifications straight to your Slack workspace, so you can keep real-time tabs on any new comments, replies, and mentions in your Image MarkUp (or any other kind of MarkUp).
Using the Slack Bot, you can opt for updates in your DMs or broadcast them to team members in any Slack channel. You can also choose to subscribe a channel to a select few MarkUps manually or, if it’s easier, just broadcast all updates.
Find out all about it in our nifty Slack integration blog!
But that’s not all you can markup!
Ceros Experiences. Early adopters of MarkUp.io came from our parent company Ceros for a better way to review Ceros Experiences.
You can markup Ceros preview links or published view links, but keep in mind that preview links are device-specific. As such, comments do not transfer between breakpoints. Remember to create a preview link for desktop, mobile, and tablet views to see how the Experience looks in each breakpoint.
While you do not need to be a Ceros customer to use MarkUp.io, if you’re already a Ceros user, you can use the same credentials to log into MarkUp.io. Sounds like a win-win!
MarkUp hack: Changes made in Studio are reflected in real-time in MarkUp.io – to see them, just refresh the page.
Presentations. Working on a presentation? Good news – MarkUps can be created from PPT, PPTX, or PPTM files. For Pro users, sensitive information can be protected when sending a presentation to stakeholders via the share link. Just toggle off the share link to remove someone’s access.
Text files. If you use MarkUp.io in combination with Microsoft Word and your stakeholders prefer to use OpenOffice or WordPerfect, don’t worry! MarkUp.io also allows you to markup ODT and RTF files. While you can’t edit the text directly, you can comment on your colleague’s document without copying and pasting it into your software.
Email previews. Marketers, rejoice! You can proof your emails on MarkUp.io before blasting them out to customers. Just grab that shareable preview link and upload it as a Website MarkUp.
Swipe files. For marketers and creatives who are looking for a place to save inspiration, they can build a swipe file of website designs, blog articles, and other content that inspires them. Here, pins are handy for calling out specific elements that would work for future projects.
If you’re on the Pro plan, you can tame the creative chaos with Folders. Dedicate a Folder to engaging copy examples, another to attention-getting graphics. You can even create a Folder exclusively for the highest-quality bear pictures – whatever floats your boat!
What will you markup?
With MarkUp.io, your standard markup options are only limited by your imagination.
We’ve covered some of the most common MarkUp types and our newest integrations, but there’s a lot more where that came from. Join our Slack community to request even more file types to markup (or to be the first to know when we add new formats and integrations).