
Wishing for the website you’re working on to become real magically is like when Geppetto wished that Pinocchio would become a real boy. Unlike you, though, Geppetto had some outside help.
Rather than making a wish upon a star, we have a more practical way for you to bring your website designs to life.
Meet the website mockup.
When you add this tool to your web design workflow, you’re that much closer to getting all your stakeholders to agree on the design from the get-go and finally bring your creative ideas to life.
Our website mockup template can be the ace up your sleeve in every upcoming website design project.
But first, let’s go over the technicalities, so we don’t get tangled up in our own magic trick. 😆
Table of contents
- What’s a website mockup?
- 4 benefits of creating website mockups
- Create a website mockup in 5 steps
- Website mockup template sample
What’s a website mockup?
A website mockup is a high-quality static representation of a site’s user interface. It’s the deliverable that brings all the sketches, wireframes, and user flows to life in an actual, real-life design.
Think of it as a virtual reality (VR) experience. When stakeholders review a website mockup, they actually experience what the website will look and feel like once it is live.
But for the mockup to feel real, some elements must be included in its design.
What’s included in a website mockup?
The must-have components of website mockups include:
- Branding elements (e.g., brand name, logo, slogan, etc.)
- Page layout
- Color palettes and fonts
- Images, media content, and graphic design elements
- Actual copy or text placeholders
- Buttons, navigation bars, forms, and menus
- Social media buttons
And everything else that will be displayed on the final version of the website.
To make everything look more polished, place your web page designs into browser mockups.
When you create responsive website mockups, be sure to add mockups of how the user interface (UI) design of all the created web pages looks on smaller screen mockups.
Suppose you’re looking to earn extra brownie points. In that case, you can create separate designs for different screen sizes and encase them into isometric iPhone, iPad, MacBook Pro, and non-Apple device mockups just to make the whole experience more credible for your clients.
Plus, there’s an advantage for you too. Creating all these versions will also enable you to get a better understanding of the user experience (UX) visitors will have on different screens.😉
Designing user experiences for mobile devices is crucial to a business’s success. A 2017 study from Google found that more than 50% of people say they won’t consider purchasing from a brand that has a poorly-designed mobile site.
The same goes for working on the UI design for mobile devices. Device mockups will elevate the whole look of your mobile app design mockups.
At first glance, creating design mockups may look like a lot of work. Still, it’s all worth it in the long run.
4 benefits of creating website mockups
Creating website mockups as part of your standard creative workflow will result in benefits like:
- Cost reduction
- Time savings
- Fewer errors
- Shorter review cycles
- Faster sign-off
- Improved collaboration
Let’s see how that works.
Benefit #1: Reduce development costs
Let’s face it: there’s a very low chance that any project will be approved without revision requests. At some point in the process, there will be the inevitable back-and-forths between designers, clients, and developers to ensure they get the final product right.
Reiterations are inevitable. But stress caused by multiple rounds of revision doesn’t have to be. 😉
Having to replace an image with another on a mockup landing page differs from replacing that same element when the webpage is already up and running. The latter will cost more as this seemingly small change takes more billable hours to implement.
Website mockups can help you avoid these extra production costs simply because it’s easier to drag and drop things into a make-believe website than editing lines of CSS, HTML, and JavaScript in WordPress or other website builders.
Not only that, but some mockup tools like Figma and Sketch have developer handoff features that can save you more time and money.
For the uninitiated, developer handoff happens when a webpage mockup has been signed off by a client. This means it’s ready to be implemented. To streamline this process, some design tools can translate the designed showcase mockup into code snippets.
Benefit #2: Decrease errors and design mishaps
You know what they say: ‘two heads are better than one.’
Mistakes happen – that’s a part of any project approval process. But mockups are a great way to get team members and stakeholders involved in the web design process and catch errors when they’re easier to correct.
We know how easy it is to lose sight of minor details when following a checklist with project requirements.
To avoid errors that can turn into PR nightmares for your clients, you can create and share website mockups with your team before the official client review.
Having experienced designers from your team review your work will help ensure you haven’t overlooked any important detail that your non-designer client would probably not even notice.
Benefit #3: Minimize feedback loops
Just like mistakes, misunderstandings that result from ineffective feedback are bound to happen. But if you start reviewing website mockups internally, you’ll be able to shorten feedback loops and streamline your review and approval process.
And that’s not even the only way website mockups can minimize feedback loops.
Website mockups help ensure your clients are on the same page as you and your team.
If you work with non-design-literate professionals, you know it’s hard to help them accurately picture the eventual real-life home page from only wireframes and sketches.
They might agree on a proposed design in the form of a wireframe only to realize it’s not what they were looking for when the design has already been implemented.
When your client can’t quite articulate what the home page should look like, you have to juggle massive reworks and ambiguous feedback.
Situations like this result in missed deadlines that can delay other projects your team is involved in and cascade into overwhelming time-management issues.
So, do your clients (and yourself) a huge favor by serving them with a visual website design mockup. From there, you can steer the design process in the right direction and ensure that edits and changes won’t have a huge impact on the project budget.
Benefit #4: Get projects approved faster
With vague revision requests a thing of the past, clients can speak their minds faster and more easily.
And when you’re armed with precise reviews, you can tweak your designs, so they’re up to par with clients’ expectations.
You know those moments when you ask yourself, “What did they mean by this?” while staring into the void of what looks like an ode inspired by your clients’ dissatisfaction? Website mockups have the magical ability to make them a thing of the past.
With so many benefits waiting for you, you probably can’t wait to get to the know-how part.
The good news is that you don’t have to. Let’s get right into it.
Create a website mockup in 5 steps
Creating website mockups is much easier than bringing a little wooden puppet to life. Instead of relying on fairies and magic, you only need to follow five steps to mockup a website the right way.
Let’s get started:
Step #1: Establish users’ needs
The first step toward a smooth review and approval process of your website mockup is to ensure you understand what your client wants.
Have a meeting with stakeholders, ask clarifying questions, and follow up by writing a creative brief.
Your brief should contain:
- A project summary
- Defined project goals and objectives
- An overview of the client’s company
- Details of the project’s target audience
- A competitive analysis
- A description of the expected deliverables
- A project timeline with due dates and milestones
- The project budget
A well-structured creative brief will help you and your team understand what the client expects from the project. This will make bringing their vision to life much easier for everyone involved.
Step #2: Create user flows and wireframes
Following the creative brief, create a user flow documenting all the paths and decisions of a website visitor.
This step helps you understand the customer journey and ensure your design is not only pretty but also functional. And we all know how important functional design is for customer retention.
Website visitors tend to leave a site when they cannot find what they are looking for within a few clicks. So, intuitive user flows are a must!
Based on the user flow, create wireframes, which are skeletal framework sketches of your design.
Wireframes are easier to play around with than full-scale design mockups and ultimately save you time.
Step #3: Add images, typography, and interactions
As soon as you’re happy with how your wireframes look, it’s time to start working on the actual website mockup.
Use design platforms (e.g., Dribbble, Adobe Photoshop, etc.), a stock image portfolio website (e.g., Shutterstock), image discovery engines (e.g., Pinterest), and other design resources to collect high-resolution images for your mockups.
Aside from all the graphic and media elements, you’ll also need to find display mockups for different screen sizes.
After you collect everything you need, arrange all elements according to the wireframe sketches.
Step #4: Test usability
At this stage of the development process, usability testing is just another way of saying ‘internal review.’
Sure, some tools enable you to create interactive prototypes. But there’s no real way to test a website’s usability until it’s live and a user actually uses it.
So, after you finish populating the website mockup template with all the necessary images and placeholders, share it with the team and request feedback.
Ask your team to focus on functionality, UX design, and the different website screen sizes while comparing the final product design with the requirements from the creative brief.
Implement the feedback and prepare your design for the final and most important review.
Step #5: Get feedback and finalize your mockup
Finally, share your website screen mockup with the client and the rest of the stakeholders.
To make this last review easier without worrying about feedback silos hidden in long email exchanges, you can upload your mockup onto an annotation tool like MarkUp.io.
With MarkUp.io, you can drag and drop AI, EPS, PSD files, and other popular file formats on the Workspace. Then the platform creates a sharable, virtual copy of your designs—we call it a MarkUp. You can then share your MarkUp and showcase the mockups to your clients via a link.
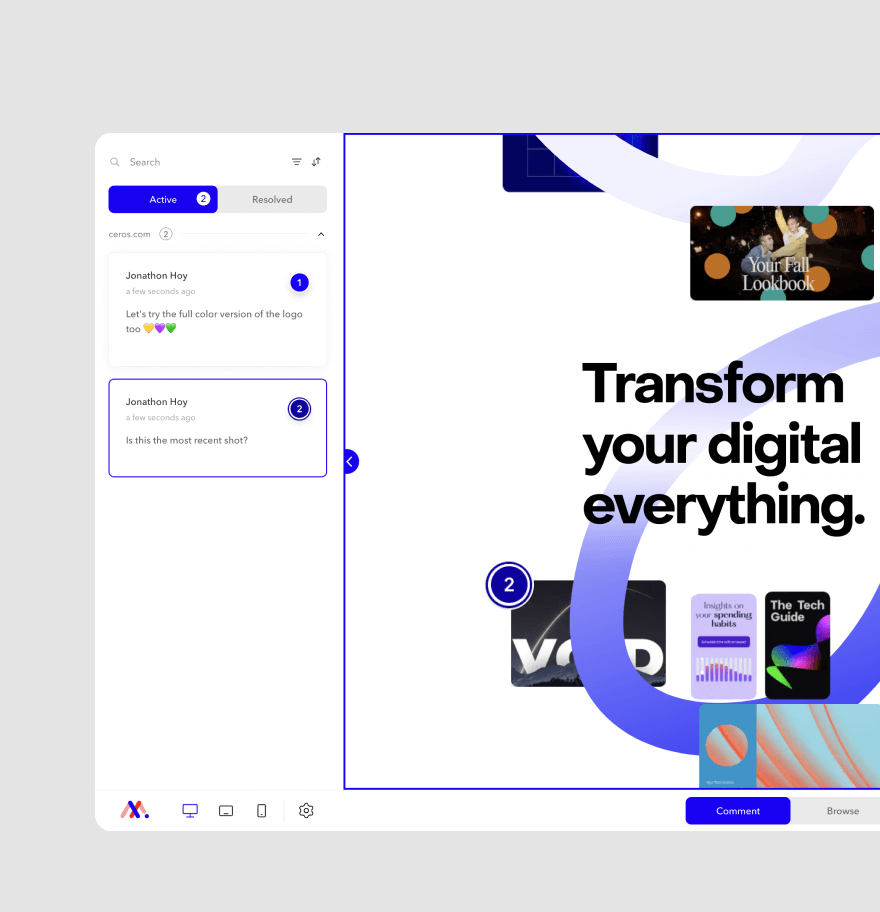
Stakeholders, clients, and other people you shared the MarkUp with can pin comments to elements they want to be changed. This feature will help you get contextual, pixel-perfect feedback you can see and address in real time.
Implement your client’s suggestions, resolve the comments, and hand your mockup over to the developers.
No need to wish for your website to become real in this instance. Your work here is done!
Ready to create a website mockup design from scratch? We’ve got something to help you out!
Website mockup template sample
We’ve created a website mockup design template sample using Canva, a free web-based design tool. Check it out for inspiration!
The template features a complete mockup set that includes:
- An iPhone mockup to showcase your mobile-friendly design
- A website presentation mockup for desktop devices and laptops
- A medium-sized screen mockup for tablets
This sample template should get your creative juices flowing and make the mockup creation process less intimidating. View it here!
Before running away into the sunset to create your mockup template, there’s one more thing we’d like you to know.
Over to you
We might not be able to make Pinocchio a real boy, but we can help you transform your website mockup templates into real websites faster.
Think of MarkUp.io as a magic wand you can flick to make client reviews faster, more precise, and easier to address.
Sign up for your free 30-day trial with MarkUp.io to bring your web design projects to life the easy way!