
A website has a direct impact on a business’s bottom line. It helps brands establish credibility, acquire new leads, and share their values with the world.
So, website design is pivotal to a brand’s image and identity.
And due to the emphasis on a business’s online presence, web design is about so much more than looks.
Effective web design captures users’ wants and needs and fulfills them with leading-edge functionalities, attention-grabbing graphics, consistent branding, and stellar copy.
A lot goes into creating a site that’s more than just colorful, eye-catching awe (although that’s also part of the process).
We know that it all adds to a lot of responsibility on designers’ shoulders. Especially newbies.
Y’all are probably like:
To ease the occasionally burdensome trust brands put in you as a designer, we created the ultimate website design checklist.
It covers everything you need to do before submitting your designs for clients’ approval.
Let’s get into it!
Table of contents
- Research 📖
- Technical 🔧
- Sketches 🖌️
- UX and UI design 🎨
- Content ✍🏾
- Marketing 🗣️
- Compliance ⚖️
- Frequently asked questions (FAQS)
Research 📖
Before getting deep into the trenches of creativity, you need to establish the project’s direction.
Define your client’s objectives, understand their audience, and lay the groundwork for an effective, data-backed design.
After all, research is the easiest way to build knowledge. It helps you understand users’ behaviors and needs and where businesses fall short in accommodating them.
So, before starting any new project, do your research.
While you’re at it, here are two areas you should cover:
User research
To design a website that efficiently displays your client’s message, you need to understand the target audience and what makes the users click.
Figure out how to satisfy visitors’ expectations by conducting user research. Your findings will help you shape your designs around users’ interests and preferences.
You can start the research process by first determining what drives your audience’s motivation.
Strategies that can help you get the why behind users’ behavior include:
- Conducting interviews
- Reading industry-specific studies
- Analyzing relevant surveys or statistics
Competitor analysis
No user research is complete without having a glimpse at the products and services the target audience is currently using.
To figure out what makes your target audience happy, google the main keywords targeted by your client and learn about the competition.
Check out the highest-ranking websites and try to identify strengths and weaknesses in their designs. You can test different user flows by downloading a free resource, placing an order, etc.
This will give you an idea of what your user persona expects to get from visiting your client’s website.
As soon as you have a good grasp of customers’ expectations and competitors’ offerings, it’s time to get technical.
Technical 🔧
On top of the research foundation, you need to build a strong technical structure.
This will help you ensure a smooth user experience free from technical issues to deliver a seamless product experience.
Additionally, checking off the items below will help boost your site’s visibility in search queries.
First, you need to choose a domain name.
Domain name
Before getting your hands dirty, choose a domain name (if your client hasn’t provided one).
What makes a domain name good is its memorability — aka how easily people can memorize and recall it.
In addition, the domain should ideally tell users what they’ll find on the website.
In a nutshell, a website’s domain name should be:
- Catchy and short
- Descriptive (it includes one of the main targeted keywords)
- Branded (it includes the name of your client’s company)
- Easy to spell
CMS
If your clients expect a live website at the end of your design collaboration, the next step of the web design process is choosing a reliable content management system (CMS).
If you don’t already have a favorite, it’s easy to choose one. You just have to weigh your budget, programming skills, and the business needs of your client.
Alternatively, you can skip this step altogether and hire a freelance developer to do this part for you.
If you decide to do it yourself, you have two options:
- Choosing a low-code CMS that requires basic-level knowledge of CSS and HTML (e.g., Webflow, Squarespace, Wix, etc.)
- Going for complex-code CMS that requires extensive website development expertise (e.g., WordPress, Umbraco, Drupal, etc.)
Pro Tip: Read our blog post on the most popular CMS platforms in today’s market, discussing the features and pricing of Webflow and WordPress.
When looking at content management platforms, consider the plugins you may need to patch your customer’s business needs.
Plugins
Plugins are collections of ready-to-implement codes that enable you to add new features and functionalities to your website.
CMS platforms have extensive plugin catalogs for a wide range of capabilities — from analytics to SEO, marketing, and beyond.
For example, with Webflow you have access to tons of plugins for multiple use cases, including:
- Audience targeting and analytics: Google Analytics, Google Tag Manager, Hotjar, etc.
- eCommerce: Shopify, SimpleFunnel, SendOwl, etc.
- Content marketing: Event Calendar App, Calendly, AddEvent, etc.
- Email marketing: Mailchimp, Buttondown, ActiveCampaign, etc.
- Payment processing: PayPal, Stripe, Amazon Pay, etc.
- Social media integrations: Twitter share buttons, Pinterest widgets, embedded Instagram images and videos, etc.
After choosing the right CMS and installing the necessary plugins for your client’s needs, purchase an SSL certificate to offer users a secure connection to the website.
SSL certificate
HTTPS — you’ve probably already seen this prefix at the beginning of website URLs.
It stands for Hypertext Transfer Protocol Secure and it defines a secure protocol that encrypts data exchanged between a web page and a browser.
This is important for websites that include sensitive data like personal or financial information, since encryption disguises data and makes it more difficult for your information to be viewed or manipulated.
Sketches 🖌️
Although you might be tempted to jump straight to designing the website, save yourself the trouble of feedback back-and-forths and start with some sketches (aka wireframes).
Create wireframes and website mockups
Wireframes are schematic representations of a website, usually consisting of placeholders that define the layout of the site.
Including wireframing as a step in your web design workflow will help you showcase the site’s information architecture. It’s an easy way to establish the paths between web pages without all the distracting beauty of the design.
You can use tools like Figma, MockFlow, and Adobe XD to create these preliminary sketches for the site.
Using the same tools, take each page’s wireframe and create mockups.
This step requires you to replace all the placeholders with the actual graphics, fonts, and color pallets you’ll use in the final design.
Once finished with these initial website illustrations, submit the deliverables for your client’s review. This way, you’ll be able to implement edits easily without having to go to your CMS to tweak things.
Admit it: editing mockups and wireframes takes way less time than making changes to a live website.
Mockup and wireframe review
Use visual feedback tools for all your reviews to save even more time and frustration.
MarkUp.io can help you streamline the feedback loop with pixel-perfect, contextual reviews.
With MarkUp.io, you drag and drop your designs onto your Workspace, and the platform creates digital copies of your assets, called MarkUps.
You can share those MarkUps with your clients and collaborators via an email invite or by just sharing the link.
Reviewers can then pin feedback comments to the elements that need changing. They can even use MarkUp.io’s Loom integration to record short videos with further clarifications to get their points across faster and easier.
You can view every review session in real time! As you implement stakeholders’ feedback, resolve the comments addressed to keep track of your progress.
Feedback optimization at its finest!
In addition to design files, you can also use MarkUp.io to review live websites, text documents, images, PDFs, and even videos.
Pro Tip: Head over to our blog on how to annotate a website to learn the easiest way to provide contextual feedback on staged and live sites.
With your ideas approved, you can go on to the fun part: implementing your designs.
UX and UI design 🎨
Finally, you get to bring your ideas to life. Here are a few areas to cover for a smooth user experience (UX) and a great user interface (UI).
Information architecture
This involves organizing and structuring the information you’ll add to the site.
Sketch a diagram of all the pages to be created and illustrate the hierarchical relationships between them. It should look something like this:
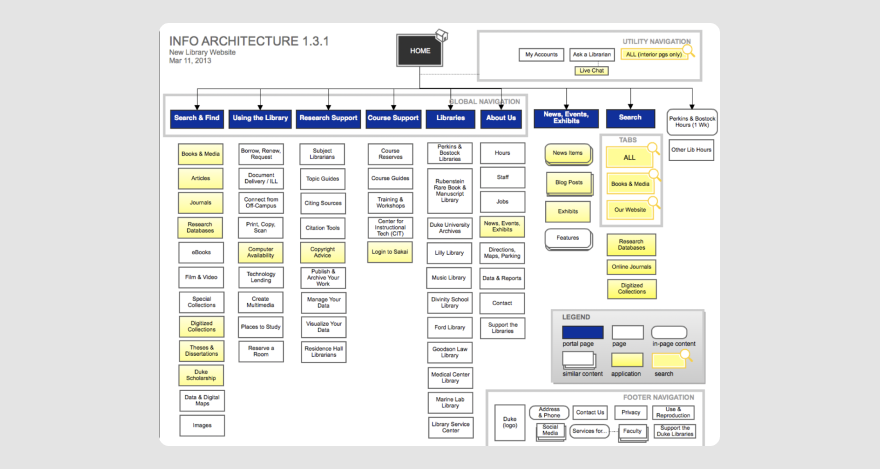
This roadmap will help you identify any flaws in the logic of the site’s structure and ensure an easy-to-follow user flow.
Interface design
Once you have all the pages laid out in the diagram, you can start designing complete layouts for all of them.
This step includes everything visual.
For example, when designing the user interface you should also map out the looks of:
- Buttons (e.g., calls to action) dropdown lists, and menus
- Text fields and date fields
- Checkboxes and toggles
- Error messages
- Navigational elements (e.g., sliders, search bars, tags, icons, breadcrumbs)
To get as close as possible to the look and feel of the final product, you can populate the pages with placeholders for content and images that you’ll add later in the process.
Interaction design
Once every visual element is in place, work on interactions (how each element behaves when users engage with it).
At this stage, define the way images, text, buttons, and all the other website elements act when users click, scroll, zoom in and out, etc.
Keep things simple and intuitive for your users and don’t forget to test everything out before moving on to the next item on the checklist.
Test your site and create backups
Your creative ideas are only as good as their function. To determine how useful and easy to use your designs are, conduct a usability test with real users.
Select a few representative users to participate in your testing program and provide them with different tasks to fulfill on different devices (e.g., sign up for the newsletter on mobile, complete a contact form on desktop).
Record users’ actions to see how fast they can complete the tasks and which steps are more difficult to complete.
This whole process will help you pinpoint any remaining user flow issues.
When your test results are satisfactory, replace the placeholders with actual content.
Content ✍🏾
The next thing to check on your list is website content.
Regardless of the type of website you’re creating, it will most certainly include text, images, and branding elements.
Now, as a designer, content writing might not be your strong point. Luckily, we have a few ideas. 👇
Copy and images
You’re probably outsourcing this part of the process to a copywriting team. But if you want to give writing a go, it’s better to:
- Keep sentences short and avoid fluff
- Avoid overly complicated structures (e.g., sentences with multiple commas)
- Use bullet points to make your text easily scannable
- Leverage active voice for increased engagement
- Make use of heading hierarchy to pull focus on key details
- Use storytelling to harness relatability
- Use simple words to explain complex concepts
- Insert high-quality images through the text to make the web pages more visually appealing
- Write in your brand’s voice
Don’t forget about feedback! When writing content for a new website project by yourself, you should always ask for a second opinion.
Send your copy to a team member or a friend for a quick proofread to ensure no errors slipped through undetected.
FYI, MarkUp.io supports text document annotations as well. 🤭
Branding elements
Just as important as text and images, branding elements are not to be missed.
Place your client’s branding elements in high visibility places, such as the headers and footers of the homepage, pricing page, about us page, etc.
When doing so, ensure you’re staying consistent and aligned with:
- The formatting of the logo
- Preferred typography
- The brand’s color palette
Branding consistency matters! It can bring more customers to your client.
Another thing that can pump leads into the sales pipeline is, of course, a marketing strategy.
Marketing 🗣️
Even though you’re likely not in charge of creating a marketing plan yourself, you’re responsible for providing your client with the marketing tools necessary for running a successful website.
Such tools include search engine optimization (SEO), digital marketing, and analytics plugins. Let’s take a closer look at each of these.
SEO
SEO plugins are helpful for non-tech-savvy website owners. These tools allow users to input metadata without code, making it easy for everyone to put an SEO strategy in place.
Popular third-party tools for SEO (for WordPress) include:
- All in One SEO (AIO SEO): Good for on-page SEO and SEO audits. It provides recommendations on how to improve page-level SEO to boost traffic.
- Yoast SEO: It rates the title tags and meta descriptions added to each page, offers SERP previews, helps target keywords better, analyzes a blog post’s readability score, and more.
- Keyword Research Tool: Provides keyword suggestions related to a specific topic to improve on-page SEO.
Some CMSs come with built-in SEO functionalities. For instance, Webflow comes with SEO tools like:
- Link redirects management to avoid broken links
- Schema markup (lets search engines better understand a site’s content through descriptive tags)
- Automatic meta titles and meta descriptions
- Sitemap controls (enables users to edit and publish page titles and descriptions)
- Image alt tags editing
Your client will also need tools to measure the efficiency of their SEO efforts, so learning about them puts you in a better position to offer advice.
Analytics
Offer your clients the ability to gain insights into their site’s performance with tools like:
- Google Analytics: Helps users analyze website traffic, bounce rates, and conversions.
- Parse.ly: Measures the performance of content.
- Kissmetrics: Analyzes customer data, which makes it ideal for ecommerce businesses and software as a service (SaaS) companies.
At this point, your website is almost ready to be handed over to its rightful owner. There’s only one more thing to do — ensuring the site is compliant with data protection regulations.
Compliance ⚖️
Before the website launch, you need to ensure compliance.
All sites need a privacy policy publicly available to inform users about how their personal data is collected, stored, processed, shared, and sold to third parties.
This disclosure is required by laws under different names around the globe.
Some of the most popular data protection laws you’ve probably already heard about include:
- CalOPPA (USA)
- PIPEDA (Canada)
- GDPR (EU)
For this part of the process, you may need to seek legal advice to ensure everything conforms to the laws applicable to your client’s location.
While at it, make sure to add relevant site disclosures for ads, affiliate links, and other disclaimers.
Doing so will help you ensure full transparency into the practices and processes affecting website visitors.
***
That’s a lot of work!
But if you stay organized and follow the checklist step-by-step, you’re more likely to complete the project faster.

Plus, there are fewer chances of you overlooking any important details.
Before getting started from the top of the list, we’ve got one more thing to tell you.
Now over to you
This web design checklist is a lot to deal with, we know.
Luckily for you, there are ways to streamline some of the areas covered in this list.
For instance, you can optimize your website reviews with MarkUp.io. ☺️
Our platform can help you approve your projects faster, with less confusion around client feedback.
Give it a try! Sign up for a free 30-day trial with MarkUp.io and make that dread of design feedback magically disappear! ✨
Frequently asked questions (FAQs)
Q1. What’s a web design checklist?
A web design checklist is a to-do list that helps designers establish standardized workflows without overlooking important steps in the process. Such a list usually contains detailed steps for research, web development, design, marketing, etc.
Q2. What’s the basic process for designing a website?
The basic processes for designing a website include:
- User research and competitor analysis
- Creating wireframes, user flows, and prototypes
- UX and UI design
- Content creation
- Testing
- Launching the website
Q3. What are the main elements of good website design?
The elements that make a website design good include:
- Functionality and usability
- Content and search engine optimization
- Visibility in search results
- Aesthetically pleasing and brand-aligned visual elements
- User flows and interactions